Introduction
Thank you for your purchase!
This documentation will guide you through the customization possibilities of Blue Collar WordPress theme. If you are new to WordPress, I highly recommend you to read through some beginner tutorials first.
If you are already loving Blue Collar theme, please don't forget to rate it 5* under your downloads section of your profile. Thank you!
Installation
First step is to install the WordPress. If you need help with that, please read this tutorial
Now, let's install the theme itself. First make sure that you have downloaded full package .zip file from ThemeForest.

- Click on Download button next to purchased item
- Choose All files & documentation and download the zip file. Unzip the file

- Enable email notifications if you want to be informed when the new update is available
- If you like the theme, don't forget to rate it 5* please. Thank you!
When you unzip the downloaded file, you will get bunch of folders. The most important one is the THEME folder.

- THEME folder contains the installable theme .zip.
Now go to wp-admin of your site and let's install the theme.

- Hover over Appearance
- Click on Themes

- Click on Add New

- Click on Upload Theme, choose theme .zip from THEME folder and install it
It is highly recommended to install the child theme as well. Learn more about child themes here. Child theme .zip can be found in Child Theme folder. Install it in the same way as parent theme.
If you have installed both parent and child theme, let's activate the child one under Appearance / Themes.

- Hover over child theme and click on Activate
After activation, you will see a notificatin about required plugins.

- Click on Begin installing plugins

- Select all plugins
- Click on Bulk Actions selectbox
- Choose Install
- Click on Apply button
Now go to Plugins and activate those new plugins.

- Select new plugins
- Click on Bulk Actions selectbox
- Choose Activate
- Click on Apply button
Optional: you may also want to install the TablePress plugin which is very handy tool for creating tables.
Installation is complete, now let's set up this theme and add some content!
Quick Reference
Header
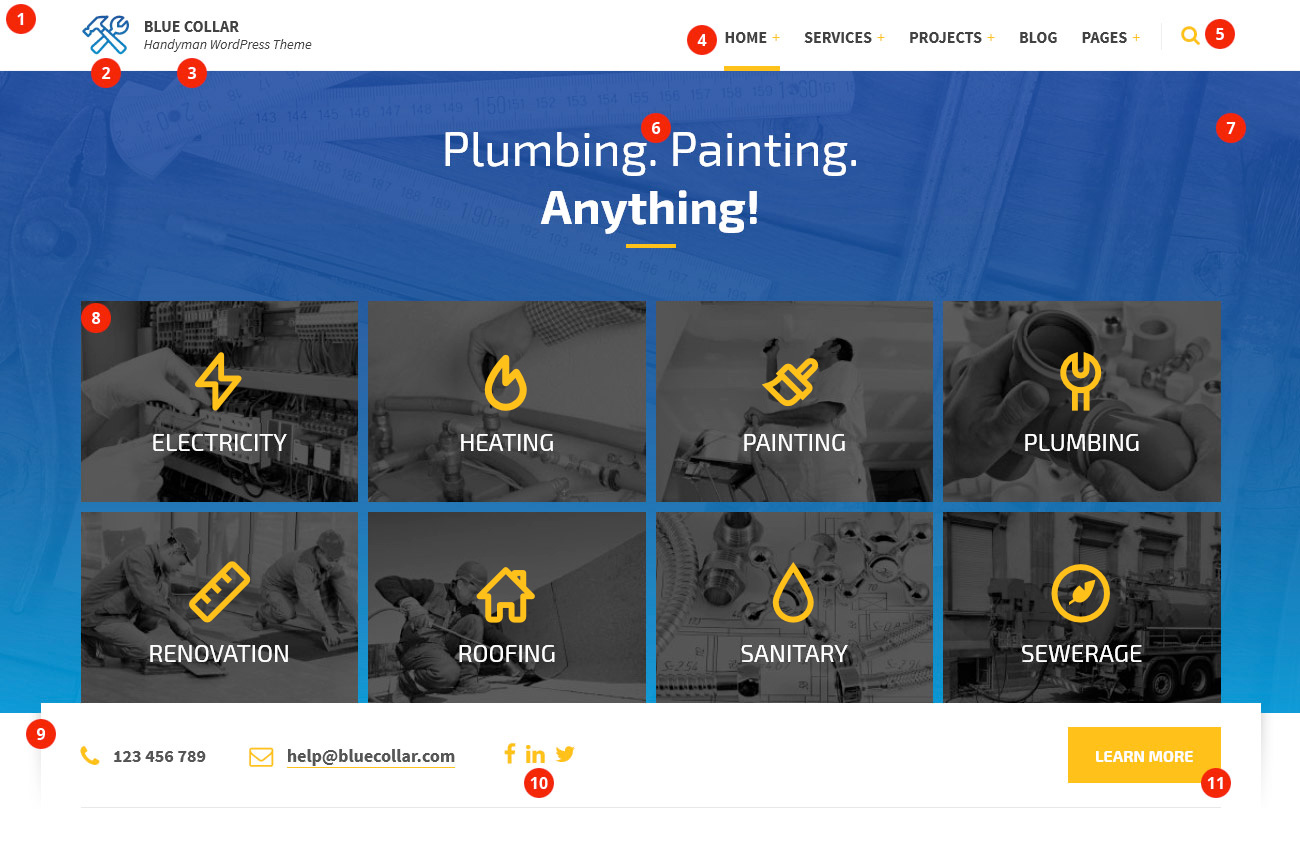
- Top bar. It is fixed by default, but you can change this behaviour under Theme Options / Header Settings with Fixed Top Bar option
- Logo. You can insert your logo under Theme Options / Header Settings using Logo option
- Branding info. You can change this text under Theme Options / Header Settings using Branding Info field.
- Header menu. You can manage your menus under Appearance / Menus. Theme locations option should be set to Header Menu
- Header search. You can toggle this element under Theme Options / Header Settings using Header Search option
- Page title. By default, standard page title will be used, but you can override this text under Page Settings / Header using Override Page Title field when editing a particular page
- Header background. You can upload your own background image under Theme Options / Header Settings using Header Background Image field. Please note that color overlay is created via CSS, so the image itself can be black and white for smaller file size. If you want to change opacity of this color overlay, read this. Also, you can define a Featured Image to override this image for individual pages
- Header services. You can toggle header services under Theme Options / Header Settings using Show Service List Globally option. This will show/hide them globally across all pages. If you want to enable them just for individual pages, check out Page Settings / Header and use Show Service List option when editing a particular page. Learn more about services here
- Contact panel. It can be enabled under Theme Options / Header Settings using Show Contact Panel Globally option. This will show/hide it globally across all pages. If you want to enable it just for individual pages, check out Page Settings / Header and use Show Contact Panel option when editing a particular page. Contact info itself can be edited also under Theme Options / Header Settings using Quick Contact Info 1 Icon, Quick Contact Info 1 Text, Quick Contact Info 2 Icon ... etc. fields.
- Social icons. They can be managed under Theme Options / General Settings using Social Links option. To toggle them in Contact panel, go to Theme Options / Header Settings and use Show Social Icons in Contact Panel option
- CTA Button. It can be edited under Theme Options / Header Settings using CTA Button Label and CTA Button Link fields
Footer
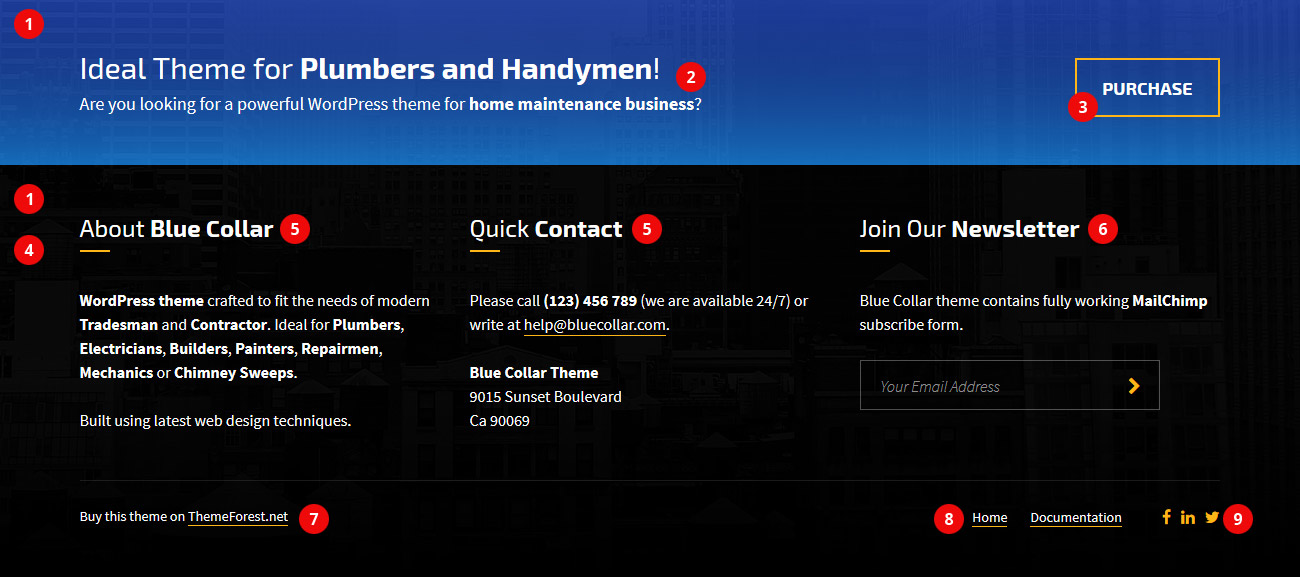
- Footer background. Background image can be defined under Theme Options / Footer Settings using Footer Background Image field
- Footer CTA. It can be enabled under Theme Options / Footer Settings using Enable Footer CTA Globally option. This will enable it globally across all pages. If you want to enable or override it for individual pages, check out Page Settings / Footer and use Footer CTA option
- CTA button. This button is part of Footer CTA. It can be edited under Theme Options / Footer Settings using Footer CTA Button Label and Footer CTA Button Link fields. You can override its settings for individual pages under Page Settings / Footer using Footer CTA option set to Custom
- Bottom panel. Bottom panel widgets can be managed under Appearance / Widgets using Bottom Panel sidebar
- Text widget. If you want to use a bold text in its title, use [strong] tag.
For example
Quick [strong]Contact[/strong] - Mailchimp Subscribe widget. Read how to obtain a correct Mailchimp Link for this widget
- Footer text. It ca be edited udner Theme Options / Footer Settings using Footer Text field
- Footer menu. You can manage your menus under Appearance / Menus. Theme locations option should be set to Footer Menu
- Social icons. They can be managed under Theme Options / General Settings using Social Links option. To toggle them in Footer, go to Theme Options / Footer Settings and use Show Social Icons option
Post Types
Standard Page
The most important thing when creating a page is to choose suitable Template under Page Attributes. Leave it to Default Template for basic pages, like for example Contact page. If you want to have a sidebar on this page, use With Sidebar template.

- Choose a template
Remember, when you are using any of the Full Width templates, you will have to manually contain your elements in containers if you don't want them to stretch. To do so, you can either nest them in Container shortcode if you are using Shortcode Generator, or enable Wrap in Container option for Row elements when you are using Page Builder (please read Page Builder section for more info).
At the bottom, there is a Page Settings section. All setting here should be self-explanatory. Just remember, that for all options set to Global, appropriate settings from Theme Options will be used.
Standard Post (Blog)
Standard posts are the core for each WordPress site. They can be used for blogging or news. First thing to do when you want to use posts is to create a standard page.

- Title will be used on any place where a reference to post list page is needed (page title for post list, page title for single post, breadcrumbs)
- Leave content blank. Even if you add a text here, it won't be displayed anywhere
If you have created your Blog page, go to Settings / Reading.

- Choose A static page (select below)
- Select your Blog page and save your changes
Please note, that Template option in Page Attributes have no effect on this page. If you want to enable sidebar for Blog pages, you can do it under Theme Options / Blog (posts).
On the other hand, all settings under Page Settings will affect both your post list and single post (except "Override Page Title").
Service
Services can be managed under Services in similar way to standard posts. LSVR Toolkit (Blue Collar) plugin must be installed to use this feature.
Service thumb and icon can be added under Service Settings.

- Upload an image which will be used as a thumbnail in service list
- Add an icon class. Read more about icons here
Project
Projects can be managed under Projects in similar way to standard posts. LSVR Toolkit (Blue Collar) plugin must be installed to use this feature.
Settings for single project can be edited under Project Settings.
Slide
Slide is a special post type for use with Slider shortcode (either via Shortcode generator or Page Builder). Slides can be managed under Slides in similar way to standard posts. LSVR Toolkit (Blue Collar) plugin must be installed to use this feature.
Slides can be grouped together via sliders. This works in a same way as categories for standard posts. Then, when you insert a Slider shortcode, you can choose a specific slider and only slides associated with this slider will be displayed.
Featured Image will be used as slide's background (but you can also define a single background for whole slider when you insert Slider element).
Settings for single slide can be edited under Slide Settings.
Importing Demo Data
If you want to recreate a demo look ASAP, you may want to import the demo data. Please note that demo images are NOT part of import file (read more).
How to import
Demo Data folder contains two files which can be imported: demo.xml for importing demo pages and posts and theme_options.txt for importing demo Theme Options settings.
demo.xml can be imported under Tools / Import. Click on WordPress and you will be prompted to install WordPress Importer plugin. Once installed and activated, visit again Tools / Import, click on WordPress and choose demo.xml file from Demo Data folder in full package.
theme_options.txt can be imported in Theme Options / Import/Export. Click on Import from file and paste content of the theme_options.txt file.
Using Page Builder
This theme comes with a very powerful page builder - Visual Composer. You may want to read its official knowledge base if you need help using it. If you are already familiar with VC, you may found out that not all default VC elements are available with this theme.

- If you don't see page builder when editing page, click on Backend Editor button. If you don't see this button, read this
Row element in Full Width templates
When you are using any of Full Width page templates (page templates can be set under Page Attributes) you need to watch your top level Row elements as their content will be stretched to full width by default. This behaviour is expected when you want to use Slider or Parallax Section element (that's why you will use Full Width templates for pages containing those elements in the first place), but you will probably do not want to see other elements stretched like that.
To fix this, open Row settings and check Wrap in Container option.

- Open Row settings

- Wrap this row in container if you are using any Full Width template and don't want content of this particular Row stretch to full width
- Optionally, wrap this row in section to better structuralize your page
Using pre-defined layout templates
As with default VC elements, not all default predefined VC layout templates are supported. But at the other hand, there are bunch of theme-specific ones available.

- Open layout templates modal
- Display predefined templates
- "Tools" icon indicates that this is a theme-specific template
- Description in brackets indicates which page template should be selected in Page Attributes (but it may work with different page template as well, feel free to experiment). If there is no description, then this layout is primarly designed for use with Default Template
One Page
To create a One Page, create a standard page first. Set its template (under Page Attributes) to either One Page or Full Width One Page.

- One Page templates
Add your content via Page Builder and set a Custom ID for each Row which will be refered to an item in header menu. You can also use a Shortcode Generator with Section shortcode.

- Click on Row settings

- Insert an unique ID
- Optionally, wrap this row in section to better structuralize your page
- Optionally, wrap this row in container if you are using Full Width One Page template and don't want content of this Row stretch to full width
Now, you need to create a separate header menu for this page. Navigate to Appearance / Menus and create a new menu. Then set its location to Header Menu (One page).

- First create a menu, then set its location to Header Menu (One page)
If you want to add a link pointing to One Page sections, click on Links and use "#" with section ID as a link.

- Choose Links
- Add your section ID prefixed with "#"
- Title of this menu item
- Insert this link to your menu
Custom Skin
The easiest way to create a custom color scheme (skin) is to make copy of the existing one from library / css / skin folder and change some SASS variables.
First thing you have to do is to locate existing skin file. You can either find it by extracting installable theme .zip file and navigate to library/css/skin, or open default.scss directly from the demo.
Now copy content of this file to any text editor (I recommend Notepad++ if you are on Windows). You will find all color variables at the top of the document, most important ones are $accent-1 and $accent-2. You can change just those two colors to create a brand new skin, but of course, you can play with values of all other variables to fine-tune your scheme. Visit colorhexa.com to see a comprehensive list of colors and their hex values.
After you have made your changes, you should save this file anywhere on your local machine or online. You never know if you would need it to make some additional changes in future. Then navigate to any online SCSS to CSS converter, for example sassmeister.com. Paste your code to corresponding field (SCSS or SASS) and copy generated CSS code.
Now, make sure that you are using Child Theme. If not, then please follow the whole installation guide to learn how you can install it. Open child theme folder and navigate to library/css/skin and open myskin.css file you will see there. Paste your generated CSS and save it. You can rename this file if you want.
The last step is to visit Theme Options / Styling, enable Enable Custom Color Scheme option and insert the name of your skin to Custom Skin Name field (without extension). So if you haven't renamed it, write myskin.

- The final step. Insert name of your custom skin file under Theme Options / Styling in Custom Skin Name field
Icons
This theme uses two icon sets - FontAwesome and Nova icons (implemented via IcoMoon).
Some elements, inserted via Shortcode Generator or Page Builder, have an option for inserting icon name. Choose any icon from FontAwesome library (click on icon to see its class) or Nova icons libary and use its full class (with additional "fa" or "im" respectively).
For example "fa fa-heart" or "im im-droplet" (without quotes).
FAQ
- How to update the theme?
- How to add custom CSS?
- How to create (pricing) tables?
- How to edit excerpt for post/service/project?
- How to create a Twitter feed widget?
- How to obtain a correct link for Mailchimp widget?
- How to change opacity of header's color overlay?
- How to activate all default Visual Composer elements?
- How to enable Visual Composer for Projects, Posts or Slides?
- How to properly set up Front page?
- How to properly set up Blog?
- How to set up Contact Form using Contact Form 7 plugin?
- How to translate the theme?
How to update the theme?
When there is a new update, go to your Downloads on ThemeForest, click on Download button next to purchased theme and choose Installable WordPress file only. Now go to Appearance / Themes in wp-admin and delete parent theme. You will have to activate any other theme to see an option to delete the active one. If the parent theme is deleted, just install the updated one in the same way, as you did when you installed the theme for the first time. Don't worry, your wp-admin settings and content won't be deleted.
How to add custom CSS?
You have two options to do that. The easier one is to add your CSS code under Theme Options / Custom CSS/JS in CSS Code field.
If you need to add more complex code, for example for different screen sizes, you should use Child Theme and edit style.css found in its root.
How to create (pricing) tables?
You can use TablePress plugin.
How to edit excerpt for post/service/project?
Excerpt is used for post/service/project listing pages. It is recommended to define the excerpt for each of those post types.

- Click on "Screen Options" in upper right corner

- Check "Excerpt" option
Scroll down to see "Excerpt" field.

- Insert your text
How to create a Twitter feed widget?
Create your widget at Twitter.com and paste generated HTML code into standard Text widget.
How to obtain a correct link for Mailchimp widget?
You need to have a Mailchimp account in order to make subscribe form work.
Log in to Mailchimp and go to desired subscribers List which you want to connect with this template. Click on Signup forms and build some basic signup form. If you want to use this template's subscribe form as it is, you will need just an email field (field tag EMAIL). When you are done building the form, go back to Signup forms and click on Embedded forms. You should see the code of your form in Copy/paste onto your site section. Copy it into your text editor, but you need just form's action URL. Search for "<form action=" and copy the whole URL. It should look similar to this: http://lsvr.us14.list-manage.com/subscribe/post?u=8291218baaf54ddfd7dbc6016&id=f3e5d696dc.
You need to edit it a little bit though. Replace "post?" with "post-json?" and add "&c=?" at the end. You should get something similar to this: http://lsvr.us14.list-manage.com/subscribe/post-json?u=8291218baaf54ddfd7dbc6016&id=f3e5d696dc&c=?.
Add this URL to Mailchimp Link field of Mailchimp Subscribe widget.
How to change opacity of header's color overlay?
Read about custom skins first.
To change color overlay's opacity, open .scss file of your skin and search for first occurence of "page-header-top-inner". The line looks like this:
.page-header-top-inner { background-color: $accent-2; background-color: rgba( $accent-2, .9 ); }
Just change value of ".9" to any value from "0" (100% opacity) to "1" (no opacity). For example use "0.5" for 50% opacity. You can also change the value of ".6" on the next line to change opacity of additional gradient color.
Don't forget to convert .scss to .css as described here.
How to activate all default Visual Composer elements?
If you are already familiar with Visual Composer, you may find out that not all default VC elements are available in this theme. That's because they may not be 100% compatible or there are custom theme elements which substitute their functionality.
However, you can enable those hidden elements by adding the following line to your child theme's functions.php:
add_filter( 'lsvr_bluecollar_deactivate_default_vc_elements', 'lsvr_deactivate_vc_elements' );
if ( ! function_exists( 'lsvr_deactivate_vc_elements' ) ) {
    function lsvr_deactivate_vc_elements() {
        return false;
    }
}
How to enable Visual Composer for Projects, Posts and Slides?
By default, Visual Composer is enabled only for Pages and Services. To enable it for other post types as well, go to Settings / Visual Composer and check appropriate options under Content types.
Check lsvrproject to enable VC for Projects and lsvrslide to enable it for Slides.
How to properly set up Front page?
If you have created your front page (and ideally Blog page too), go to Settings / Reading.

- Choose A static page (select below)
- Select your Front page
- Optionally, select your Blog page
How to properly set up Blog?
How to set up Contact Form using Contact Form 7 plugin?
Navigate to Contact, open your contact form (or create new) and add the following code to Form field:
[response]
<div class="row">
<div class="col-sm-6">
<div class="form-field">
<label for="your-name">Your Name <span>*</span></label>[text* your-name id:your-name]
</div>
<div class="form-field">
<label for="your-email">Your Email  <span>*</span></label>[email* your-email id:your-email]
</div>
<div class="form-field">
<label for="your-phone">Your Phone</label>[tel your-phone id:your-phone]
</div>
</div>
<div class="col-sm-6">
<div class="form-field">
<label for="your-subject">Subject</label>[text your-subject id:your-subject]
</div>
<div class="form-field">
<label for="your-message">Message  <span>*</span></label>[textarea* your-message id:your-message]
</div>
<div class="form-field">
[submit class:c-button "Send Message"]
</div>
</div>
</div>
Optionally, you can customize error/success messages as well. Use this code for success message:
<div class="c-alert-message m-success"><i class="ico fa fa-check-circle"></i>Your message was sent successfully. Thanks.</div>
And this code for warning message:
<div class="c-alert-message m-warning"><i class="ico fa fa-exclamation-circle"></i>Validation errors occurred. Please confirm the fields and submit it again.</div>
How to translate the theme?
Easiest way is to use Codestyling Localizatin plugin or WPML (this one is paid).
If you are also using RTL language, read this. Rtl.css is already part of the theme and contains required CSS definitions, but feel free to alter it if you need to.
Credits
Images seen in preview are NOT included. You can purchase your own licenses on PhotoDune.net:
http://photodune.net/item/urban-landscape/7811689
http://photodune.net/item/vintage-construction-tools-background/8871884
http://photodune.net/item/sanitary-engineering/852430
http://photodune.net/item/sewerage-truck-on-street-working/6261203
http://photodune.net/item/electrical-engineer-repairing-fusebox/7916785
http://photodune.net/item/two-tilers-at-industrial-floor-tiling-renovation/3980891
http://photodune.net/item/tradesman-painting-a-ceiling/4109485
http://photodune.net/item/technician-fixing-central-heating-system/7840250
http://photodune.net/item/plumbing-fittings-in-his-hand/744480
http://photodune.net/item/flat-roof-covering-works-with-roofing-felt/3886947
http://photodune.net/item/crowd-of-people/8730056
http://photodune.net/item/electrician/4198906
http://photodune.net/item/tool-holder-filled-with-handyman-tools-on-aged-wood/8406257
http://photodune.net/item/handyman-ready-for-work/4532866
http://photodune.net/item/assorted-work-tools/7004376
http://photodune.net/item/home-improvement-handyman-drilling-wood/228103
http://photodune.net/item/handyman-portrair/6055584
http://photodune.net/item/smiling-handyman/4576408
http://photodune.net/item/handyman-with-spirit-level/4529165
http://photodune.net/item/portrait-of-handyman/4627449
http://photodune.net/item/set-of-tools-on-wood-background/2973881
http://photodune.net/item/home-renovation/5420682
http://photodune.net/item/interior-under-renovation/6365443
http://photodune.net/item/room-renovation/6365437
http://photodune.net/item/refurbishment/1217394
http://photodune.net/item/renovation-in-progress/6440277
http://photodune.net/item/empty-room/4495885
http://photodune.net/item/unfinished-home-interior/6159579
http://photodune.net/item/light-wood-kitchen/2751767
http://photodune.net/item/modern-blank-interior/6741525
http://photodune.net/item/interior-room/8180092