Wordbench
Introduction
Thank you for purchasing the Wordbench theme!
The goal of this theme is to provide a powerful set of tools for creators of various types of websites, especially the municipality or local government sites. Being a WordPress theme, it can benefit from the whole ecosystem of this wonderful platform. There are thousands of free plugins which can extend your site's features and plenty of helpful resources where you can find answers to your WordPress related questions.
We hope you will find this documentation helpful and will enjoy working with Wordbench theme as much as we enjoyed developing it.
Quick Overview

- Header Notice can be enabled under Appearance / Header. You can override the static text with the Notice post link under Appearance / Notices.
- Secondary Header Menu can be managed under Appearance / Menus. Read more
- Header can be managed under Appearance / Header. you can make it stick to the top via Enable Sticky Header option.
- Header Social Links can be managed under Appearance / Customize / Social Links and you can then enable them for the header under Appearance / Customize / Header via Display Social Links option.
- Languages Menu can be managed under Appearance / Menus. Read more
- Site Logo can be added under Appearance / Site Identity and you can change its dimensions under Appearance / Header via Logo Max Width option.
- Site Title and Tagline can be enabled under Appearance / Header. You can edit it under Appearance / Site Identity.
- Primary Header Menu can be managed under Appearance / Menus. Read more
- Header Search can be enabled under Appearance / Customize / Header via Enable Header Search option.
- Header CTA can be managed under Appearance / Customize / Header via Enable Header CTA Button option.
- Wordbench Slider element, please read the Front Page tutorial to learn how to build the demo front page.
- Wordbench Sitemap element, please read the Front Page tutorial to learn how to build the demo front page.
- Wordbench Posts element, please read the Front Page tutorial to learn how to build the demo front page.
- Wordbench Split Screen element, please read the Front Page tutorial to learn how to build the demo front page.
- Wordbench Events element, please read the Front Page tutorial to learn how to build the demo front page.
- Footer Widgets sidebar can be managed under Appearance / Widgets. You can toggle it under Appearance / Customize / Footer via Enable Footer Widgets option, change the number of columns via Number of Widget Columns option and make the first column wider via Separate First Column From the Rest option.
- Text Widget can be added under Appearance / Widgets. You can make it wider under Appearance / Customize / Footer via Separate First Column From the Rest option.
- Navigation Menu Widget can be added under Appearance / Widgets. It requires a standard menu to work and you can create such menu under Appearance / Menus.
- Navigation Menu Widget with links to FAQ posts.
- Footer Text can be edited under Appearance / Customize / Footer via Footer Text option.
- Footer Menu can be managed under Appearance / Menus. Read more
- Footer Social Links can be managed under Appearance / Customize / Social Links and you can then enable them for the header under Appearance / Customize / Footer via Display Social Links option.
- Back to Top Button can be toggled under Appearance / Customize / Footer via Display Scroll To Top Button option.
Installation & Setup
The very first step is to install WordPress itself. Once installed, we can proceed to the theme and plugins installation.
Theme Installation
If you haven’t already, download the full package from your downloads on ThemeForest.
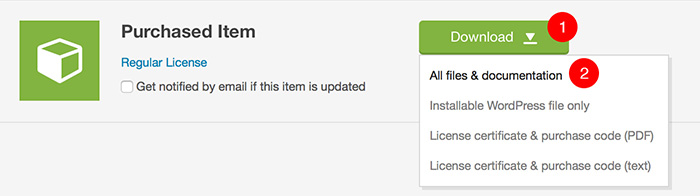
- Click on the Download button next to your purchased item
- Choose All files & documentation and download the zip file

- Enable email notifications if you want to be informed when the new update is available
- If you like the theme, please don't forget to rate it 5*. Thank you!
Parent Theme Installation
When you unzip the downloaded file, you will see a bunch of folders. The most important one is the THEME folder which contains the installable theme .ZIP.
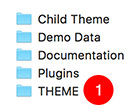
- THEME folder contains the installable theme .ZIP
Open your WordPress admin and navigate to Appearance / Themes
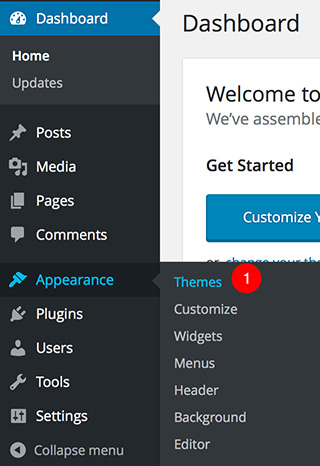
- You can manage themes under Appearance / Themes
Upload the installable wordbench.zip file
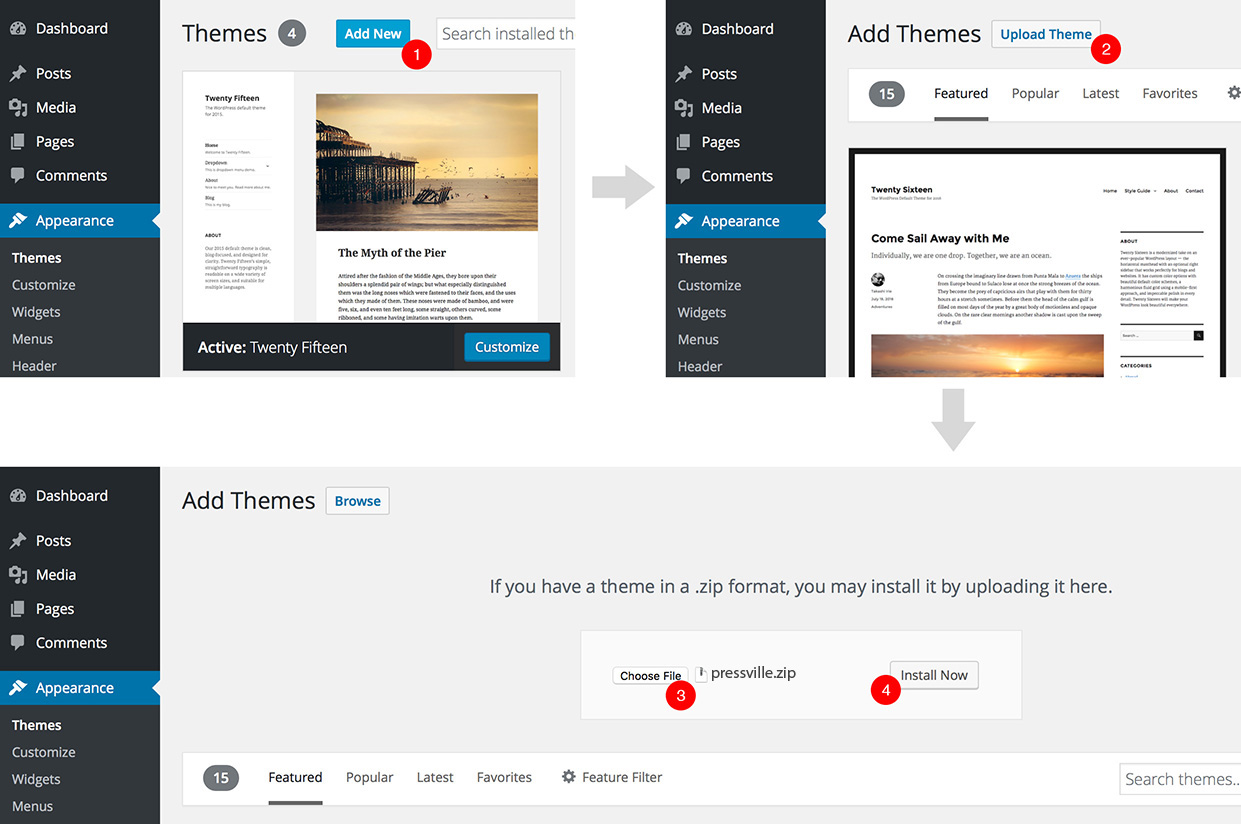
- Click on the Add New button
- Click on the Upload Theme button
- Choose theme .ZIP file
- Submit the file
Child Theme Installation
If you don’t know what a WordPress child theme is, please read this article in the WordPress codex. The article also explains how to create a child theme, but don't worry, the Wordbench child theme is already included in the package.
This documentation assumes that you are running the child theme, so it is highly recommended to install it. The Child theme .ZIP can be found in Child Theme folder. Install it in exactly the same way as parent theme, described in previous steps.
Once you have both parent and child themes installed, you need to activate the child one.
Plugins Installation
Before we proceed to plugins installation, let's talk about them a little bit first. This theme comes prepackaged with several plugins. Basically, any major functionality (like events, directory, portfolio, etc.) has a separate plugin. This has one big advantage - you can choose which one you need. For example, if you don't need the events functionality for your site (or you plan to use a 3rd party plugin for that), there is no reason to install the LSVR Events plugin. And same goes for LSVR Portfolio, LSVR Directory, LSVR Services, LSVR FAQ, LSVR Testimonials, LSVR Documents and LSVR People plugins as well. But let's do a quick overview of all of those plugins so you can decide for yourself which ones you need:
- LSVR Framework - this plugin contains a lot of custom functionality used throughout the theme and LSVR plugins, such as custom metaboxes and customizer fields. You should definitely install this one.
- LSVR Wordbench Toolkit - it contains the theme specific shortcodes (for example those used for the default front pages) as well as Slider post type definitions.
- LSVR Documents - this plugin handles the Document custom post type functionality and all its widgets. If you don't need the documents functionality or are going to use a 3rd party solution for that, don't install.
- LSVR Directory - it handles the Listing custom post type functionality and all its widgets. If you don't need the directory functionality or are going to use a 3rd party solution for that, don't install.
- LSVR Elements - this plugins adds some basic shortcodes and widgets like Definition List, Progress Bar and Feature.
- LSVR Events - this plugin handles the Event custom post type functionality and all its widgets. If you don't need the events functionality or are going to use a 3rd party solution for that, don't install.
- LSVR FAQ - this plugin handles the FAQ custom post type functionality and all its widgets. If you don't need the FAQ functionality or are going to use a 3rd party solution for that, don't install.
- LSVR Notices - this plugin handles the Notices custom post type functionality and all its widgets. If you don't need the notices functionality or are going to use a 3rd party solution for that, don't install.
- LSVR People - this plugin handles the Person custom post type functionality and all its widgets. If you don't need the people functionality or are going to use a 3rd party solution for that, don't install.
- LSVR Portfolio - this plugin handles the Portfolio Project custom post type functionality and all its widgets. If you don't need the portfolio functionality or are going to use a 3rd party solution for that, don't install.
- LSVR Testimonials - this plugin handles the Testimonial custom post type functionality and all its widgets. If you don't need the Testimonial functionality or are going to use a 3rd party solution for that, don't install.
- LSVR 3rd Party Toolkit - this plugin handles support for 3rd party plugins like Elementor and WPBakery Page Builder. Do not install this plugin if you are going to use the default WordPress block editor (Gutenberg) instead.
- Envato Market - it allows automatic theme updates for themes purchased from Envato Market. This is probably the easiest way to keep your theme up to date. However, it is not the only way. You can always just download the latest version directly from your account on Envato Market and either reinstall the theme or overwrite files via FTP. So if you prefer to update the theme manually, you won't need this plugin.
One last thing. You may be worried that so many plugins can have a performance impact on your site. The truth is that the number of plugins alone has no real impact on the performance. It's the way they are coded that's important. Since almost all of those plugins were coded in-house, their optimization and performance is fully under our control. Also, don't forget that the quality of your hosting plays a very significant role in overall performance of your site.
Bundled Plugins
Let's finally install some plugins. Once you've activated the theme, you should see a prompt message at the top of your admin informing you about recommended plugins.

- Click on Begin installing plugins
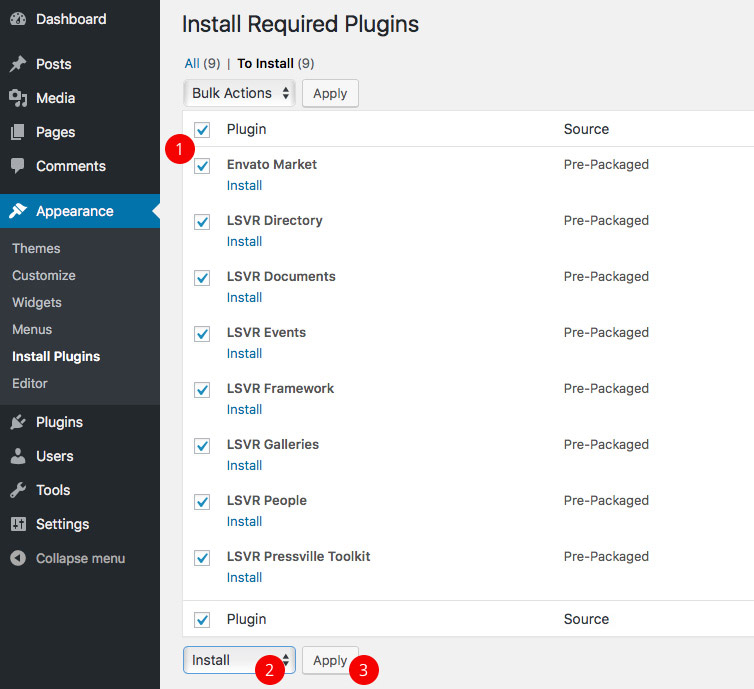
- Select either all plugins or just the plugins you need
- Choose Install
- Hit Apply
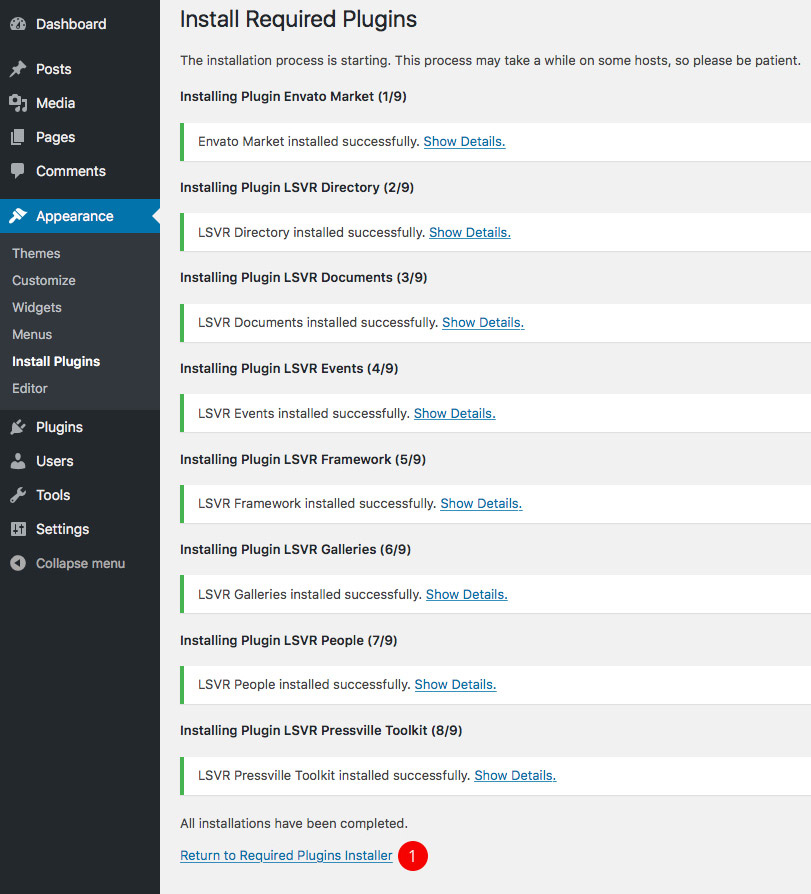
- Wait for plugins to be installed and then click on Return to Required Plugins installer
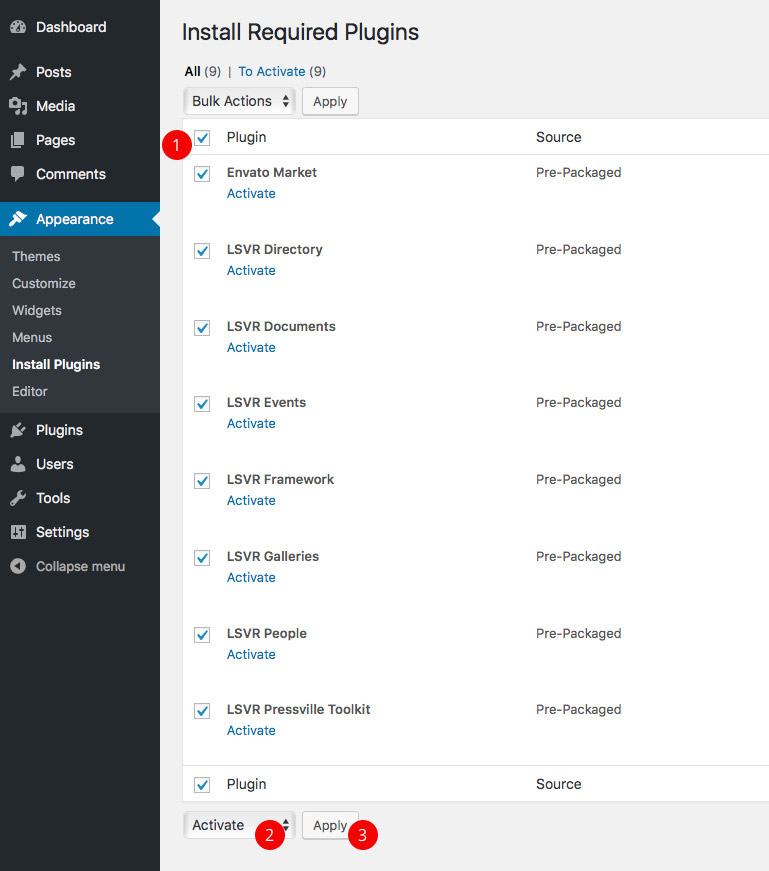
- Select all plugins
- Choose Activate
- Hit Apply
After you activate plugins, head to your Dashboard and that’s it. Plugins should now be installed and activated. Remember that all bundled plugins can be found in the Plugins folder in full package, so you can install any of those plugins manually anytime you need (via Plugins / Add New / Upload Plugin).
3rd Party Plugins
Here is a list of some useful 3rd party plugins. You can install them by typing their name in the search box under Plugins / Add New:
- Wordfence Security - very popular WordPress security plugin. It is VERY important to use a security plugin like this one.
- W3 Total Cache - a must-have caching plugin.
- Contact Form 7 - great plugin for creating simple contact forms. It was used to create a demo contact form as well.
- Intuitive Custom Post Order - allows you to reorder your posts and categories via drag & drop.
Demo Setup
Let's start by saying that we do not recommend to import the demo data at all. Why? Because you are basically bloating your site with data you will eventually want to to get rid of sooner or later. You may be tempted to have your site to look like the demo quickly and then start customizing it to your needs, but you are actually making lot of unnecessary work for yourself. Our professional advice on how to build the site using this theme (or any other WordPress theme for that sake) is to read the documentation first, then (after you install the theme and all its plugins) head to Appearance / Customize and browse through all the available options to familiarize yourself with the theme. Then go back to the documentation, head to Post-Installation Setup and simply follow all the steps, read all chapters thoroughly and apply all that knowledge to your own site. That said, it is up to you of course. If you want to proceed with the demo import, read further.
Quick Demo Import
The quickest way to import the demo data is using the One Click Demo Import plugin. To install it, simply go to Plugins / Add New and type "One Click Demo Import" into the search field. Once installed and activated, go to Appearance / Import Demo Content where you can import content, customizer settings and widgets separately (they should be imported exactly in this order).

- Import Wordbench Content first
- Then import Wordbench Customizer
- Import Wordbench Widgets last
- If you have problems with importing, you can try to upload all files manually. All import files can be found in the full package in the Demo Data folder (content.xml, widgets.wie and customizer.dat).
Once you've imported all three (content, customizer settings and widgets), continue here.
Manual Demo Import
If you want to have more control over imported data, you can do it manually. Demo data can be found in the Demo Data folder in full package.
Manual Content Import
You will notice there are several .xml files in the Demo Data folder. You can decide to import either all posts and pages or just specific post type posts.
To import the content, navigate to Tools / Import and click on WordPress. You may be prompted to install the Importer plugin if you don’t have it already. After you install and activate it, go back to Tools / Import / WordPress. Now choose which content you want to import. If you want to import everything, choose the content.xml file. If you want to upload events only, choose events.xml. You can of course do multiple imports if you want to import more than just one .xml file (for example events.xml and then documents.xml).
If you haven't installed all bundled plugins but are trying to import the content.xml file, you may notice several errors during the import process. Those are caused by the fact that posts related to missing plugins can't be imported (for example event posts without LSVR Events plugin installed). You can ignore those error messages, as they shouldn't affect the import of the other posts.
Manual Customizer Settings Import
You will need the Customizer Export/Import plugin to import customizer data. Once installed and activated, go to Appearance / Customize / Export/Import and upload the customizer.dat file from the Demo Data folder.
Manual Widgets Import
You will need the Widget Importer & Exporter plugin to import widgets data. Once installed and activated, go to Tools / Widget Importer & Exporter and upload the widgets.wie file from the Demo Data folder.
Contact Form Import
Contact form seen on the demo, which was created using the Contact Form 7 plugin, is not included in the main demo import files. You can import it manually under Tools / Import / WordPress using the cf7-contact-form.xml file from the Demo Data folder (don't forget to configure the form after the import).
After Demo Import
Regenerate Events
If you did quick import or manual import with events, head to Tools / Regen. Events and hit the Regenerate button. You won't be able to see any imported events on your front-end unless you do that. If you are experiencing any issues with this tool, you will have to resave each of the event posts one by one (at least those event posts you want to display).
Another important thing to keep in mind when importing events is that by default, events archive will show only the upcoming events. But some or all of the demo events may have already ended by the time you purchased the theme and did the import. The demo data may not be kept up to date with current demo site. The solution is to simply change the start/end dates for each event post you want to display on your site.
Front Page
You may need to set your front page and news page under Settings / Reading.
You may need to set the correct menu for the Wordbench Sitemap element. Just open the Home page in the admin, click on Wordbench Sitemap element and choose Home Sitemap in the Menu selectbox.
Menus and Widgets
Due to some limitations of the importing functionality, some sidebars and menus may not be set properly after the import. Just go to Appearance / Widgets to configure your sidebars.
Menu Links
You may notice that some of the menu links won't work because they were saved as absolute URL. To make them work, either edit them manually under Appearance / Menus, or use a plugin to change them to the correct URL. Basically you need to change "http://localhost/wordpress/wordbench-demo" to your site's URL.
Post-Installation Setup
General Settings
Your first post-installation steps should head into Settings / General.
Time Zone, Date Format and Time Format settings will be used to display date info for all post types (including event start and end dates), so make sure they are set correctly based on your locale.
Permalinks Settings
Now head to Settings / Permalinks and change Common Settings to Post name. You can also change URL slugs for all LSVR custom post types and their taxonomies below if needed.
Front Page / Blog Page
If you've imported the demo content, head to Settings / Reading and choose which pages should be used as your Front page and Posts page. If you haven't imported the demo content, then don't forget to come back to this option once you create your front page and blog pages. More info.
Managing Menus
If you already have some pages / posts on your site (for example via importing demo content), you should check out Appearance / Menus to manage your site's menus.
Media Settings
Head to Settings / Media and change the settings to the following values:
- Thumbnail size - 300x300 (crop enabled)
- Medium size - 600x600
- Large size - 1200x1200
If you already have some images on your site, use a 3rd party plugin to regenerate new image sizes based on the settings above.
Map Settings
If you are going to use the Directory or Events functionalities via bundled LSVR plugins, you will need to choose a maps provider for built-in maps to work. You can do that under Appearance / Customize / Map Settings. Please note that some providers require an unique API key for maps to work.
Content Editing
Wordbench comes with a bunch of custom post types. Working with them is very similar to working with standard WordPress posts.
Standard Posts and Pages
Posts and pages are part of the core WordPress functionality. The best place to learn more about them is the WordPress Codex.
- Global theme-specific posts settings can be changed under Appearance / Customize / Standard Posts.
- Learn more about posts
- Learn more about pages
Directory Listing
- Default directory URL is yoursite.com/directory. You can change it under Settings / Permalinks.
- You can manage your listing posts under Directory.
- The settings of a particular listing can be edited via the Listing Settings panel located under the content editor.
- Featured Image of the listing will be used as a map thumbnail.
- You can add images to your listing via the Listing Gallery panel located under the content editor.
- Add schema.org metadata via the Listing Metadata panel located under Listing Settings.
- Global directory settings can be changed under Appearance / Customize / Directory.
- This post type comes with several custom widgets which you can find under Appearance / Widgets.
Document
- Default documents URL is yoursite.com/documents. You can change it under Settings / Permalinks.
- You can manage your document posts under Documents.
- Each document post can contain multiple file attachments which can be added via the Document Settings panel located under the content editor.
- If all your document posts contain only attachments and no real text content, you may want to switch your document archive layout to Attachment View under Appearance / Customize / Documents.
- Global documents settings can be changed under Appearance / Customize / Documents.
- This post type comes with several custom widgets which you can find under Appearance / Widgets.
Event
- Default events URL is yoursite.com/events. You can change it under Settings / Permalinks.
- You can manage your event posts under Events.
- The settings of a particular event can be edited via the Event Settings panel located under the content editor.
- Global events settings can be changed under Appearance / Customize / Events.
- This post type comes with several custom widgets which you can find under Appearance / Widgets.
Notice
- Default notices URL is yoursite.com/notices. You can change it under Settings / Permalinks.
- You can manage your notice posts under Notices.
- Global notices settings can be changed under Appearance / Customize / Notices.
- This post type comes with several custom widgets which you can find under Appearance / Widgets.
FAQ
- Default FAQ URL is yoursite.com/faq. You can change it under Settings / Permalinks.
- You can manage your FAQ posts under FAQ.
- Global FAQ settings can be changed under Appearance / Customize / FAQ.
- This post type comes with several custom widgets which you can find under Appearance / Widgets.
Person
- Default people URL is yoursite.com/people. You can change it under Settings / Permalinks.
- You can manage your person posts under People.
- Global people settings can be changed under Appearance / Customize / People.
- This post type comes with several custom widgets which you can find under Appearance / Widgets.
Portfolio Project
- Default portfolio URL is yoursite.com/portfolio. You can change it under Settings / Permalinks.
- You can manage your portfolio posts under Portfolio.
- You can add images to your project via the Project Settings panel located under the content editor.
- Global portfolio settings can be changed under Appearance / Customize / Portfolio.
- This post type comes with several custom widgets which you can find under Appearance / Widgets.
Service
- Default services URL is yoursite.com/services. You can change it under Settings / Permalinks.
- You can manage your service posts under Services.
- You can add images to your service via the Service Settings panel located under the content editor.
- Global service settings can be changed under Appearance / Customize / Services.
- This post type comes with several custom widgets which you can find under Appearance / Widgets.
Slide
- You can manage your slide posts under Slides.
- Featured Image of the slide post will be used as the slide image.
- Slides can be displayed using the Wordbench Slider element.
Testimonial
- Default testimonials URL is yoursite.com/testimonials. You can change it under Settings / Permalinks.
- You can manage your testimonial posts under Testimonials.
- Global testimonials settings can be changed under Appearance / Customize / Testimonials.
- This post type comes with several custom widgets which you can find under Appearance / Widgets.
Customization
Front Page 1
The following tutorial assumes that you want to create a front page similar to the "Home 1" from the demo. The preferred way to create a front page is using the native WordPress block editor (Gutenberg). Alternatively, you can use the WPBakery Page Builder or Elementor plugin. All elements and their respective options mentioned in this tutorial are available there as well (however it is highly recommended to use the Gutenberg, unless you have some very specific reason not to).
- Make sure you've already created or imported some standard, slide and event posts before creating the home page.
- This demo page contains a Wordbench Sitemap element which requires a standard WordPress menu to work. To create such menu, head to Appearance / Menus and create a simple two dimensional menu. If you've never created a WordPress menu before, please head to WordPress Codex.
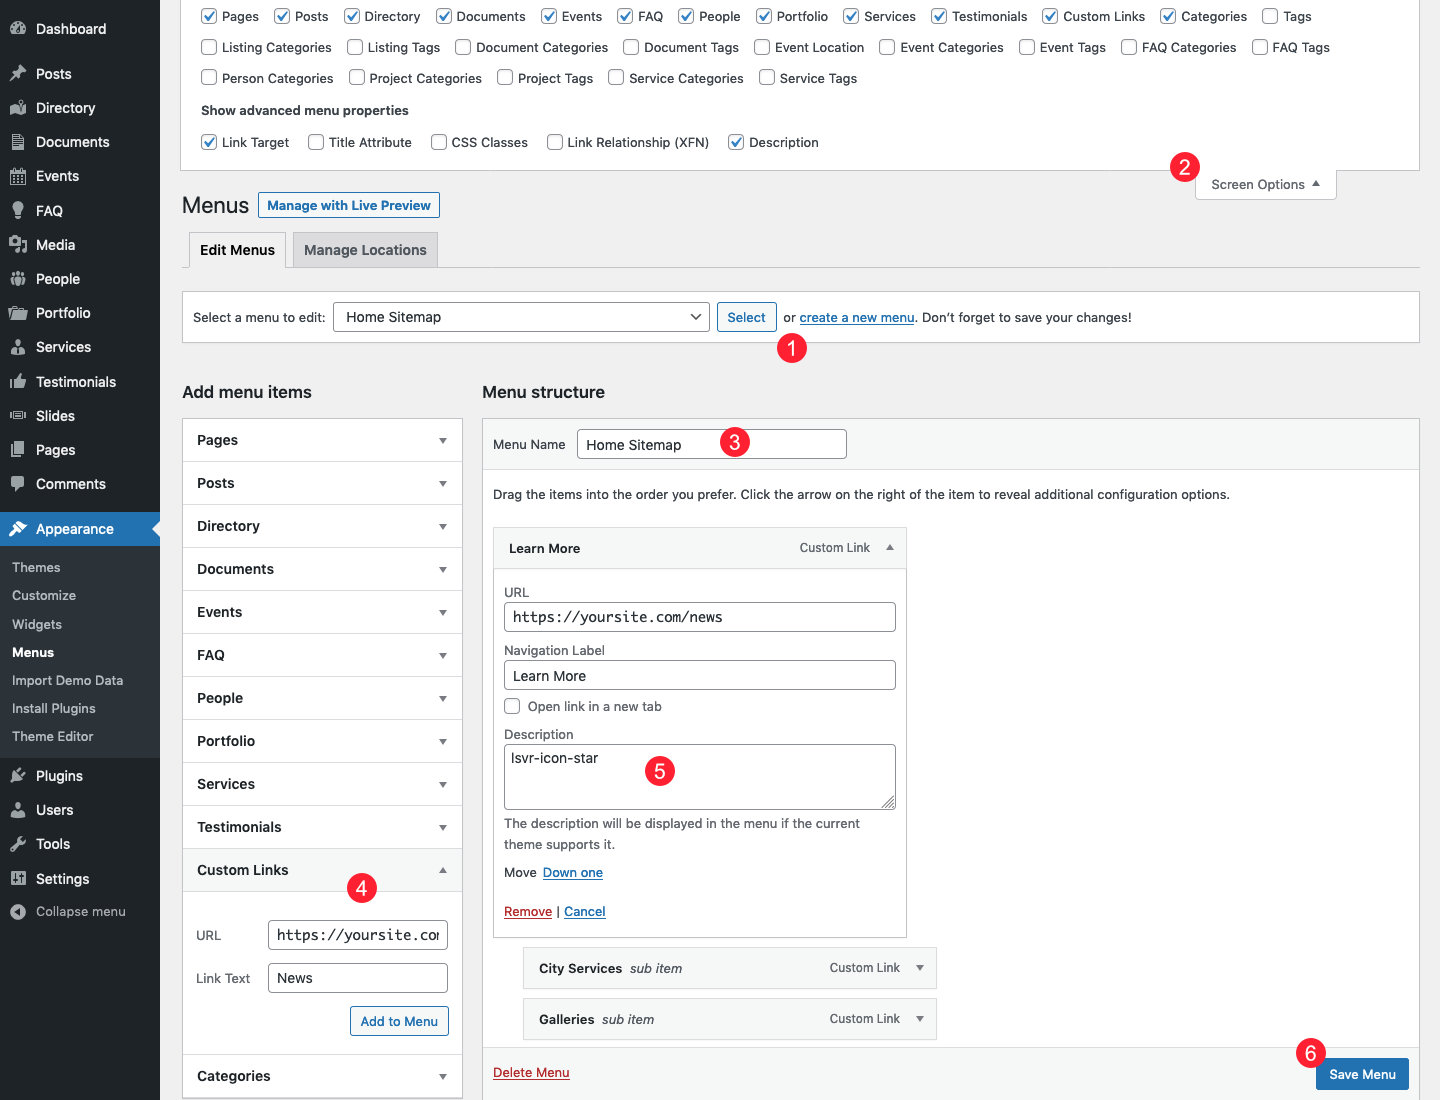
- Select an exiting menu or a create new one
- Choose which post types and taxonomies will be available in the left sidebar and enable advanced menu properties. Make sure to enable Description field
- Insert a recognizable name
- Add items to your menu. Use Custom Links option to add links to things like archive pages (yoursite.com/directory, yoursite.com/events, etc.)
- You can add an icon name to the Description field, this works for first level items only.
- Save your menu
- Now we are ready to create our home page. Let's create a new page under Pages, or edit an existing one. Set the page name and set the page template to Fullwidth w/o Title.

- Insert title which will be used just for your reference
- Set page template to "Fullwidth w/o Title"
- Next step is to start adding elements. Our first element is Wordbench Slider. Again, make sure you've already created or imported some slide posts.
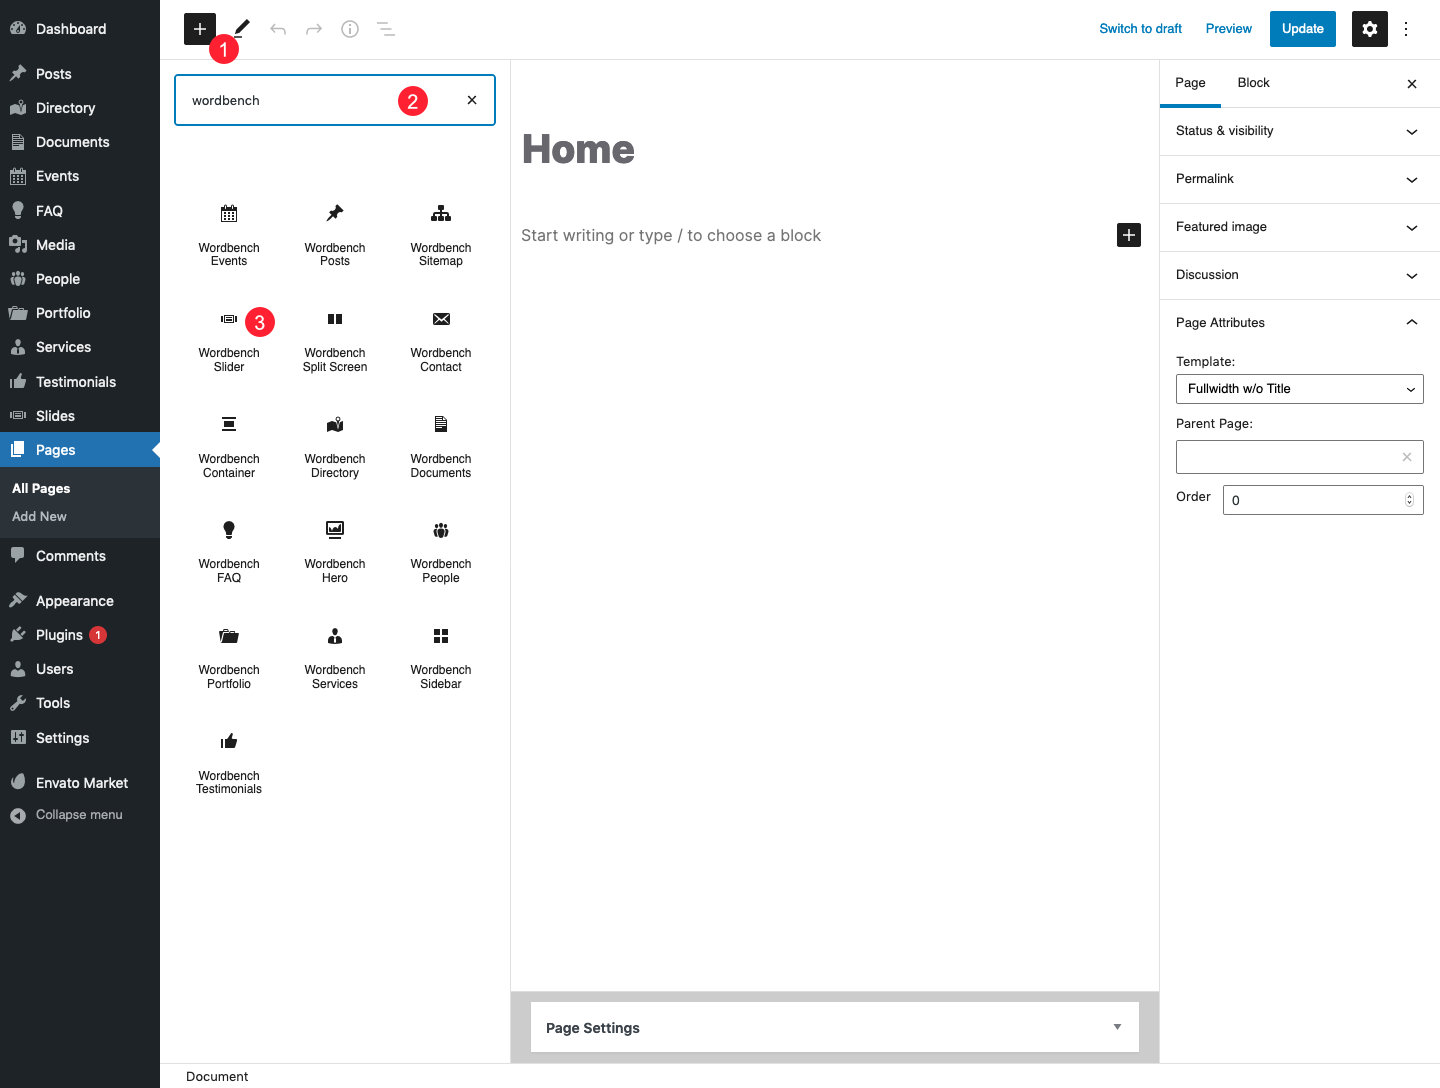
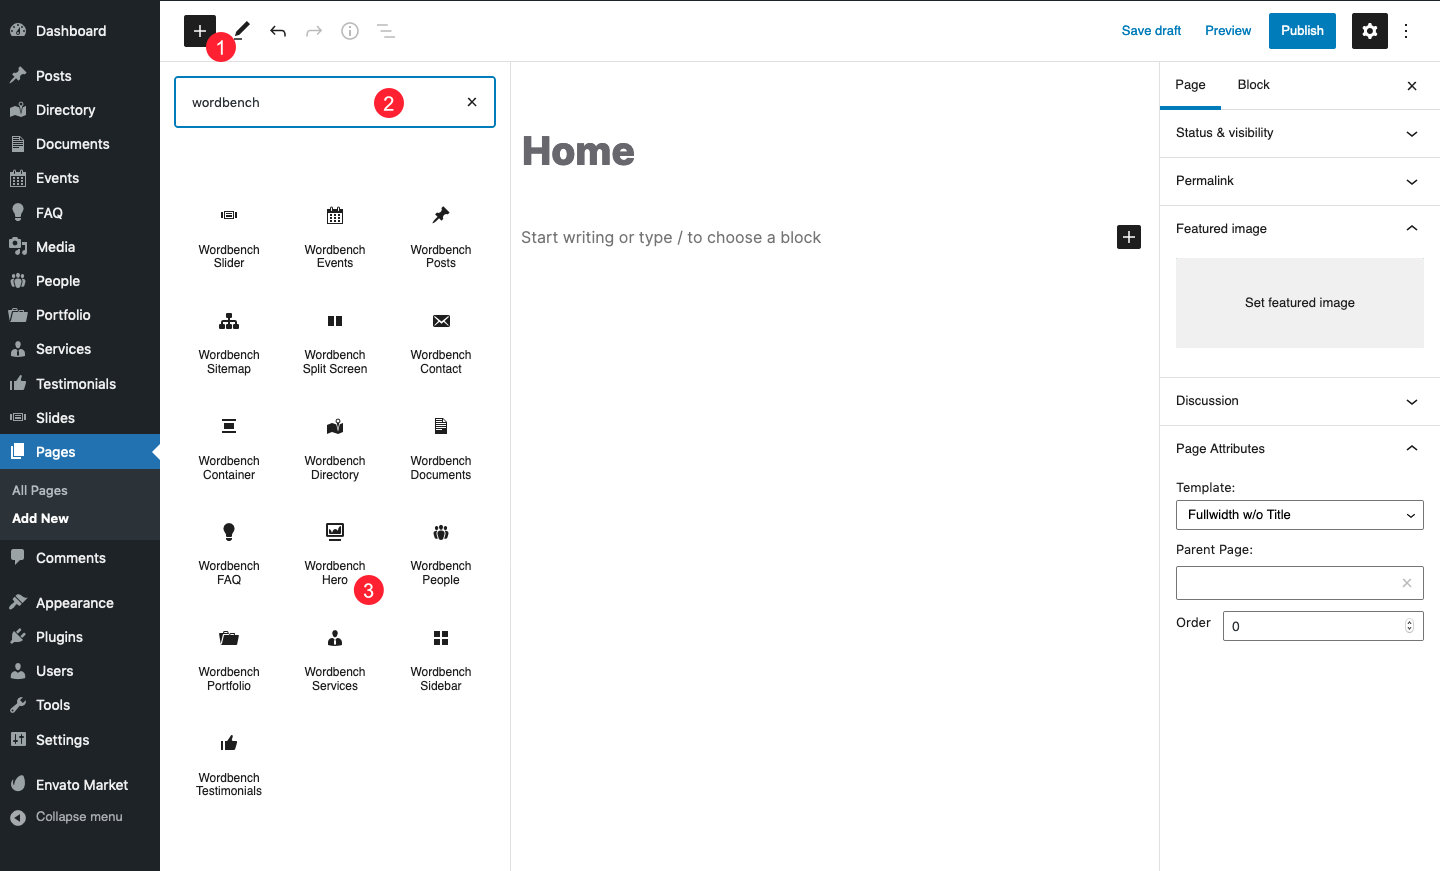
- Display list with all elements by clicking on the "plus" button in the top left of the interface
- You can type "wordbench" into the search field to list all Wordbench elements
- Click on Wordbench Slider to insert it (you can search directly for "wordbench slider" if you don't see it)
- Once the element is inserted, click on it and you can change its settings in the right sidebar.
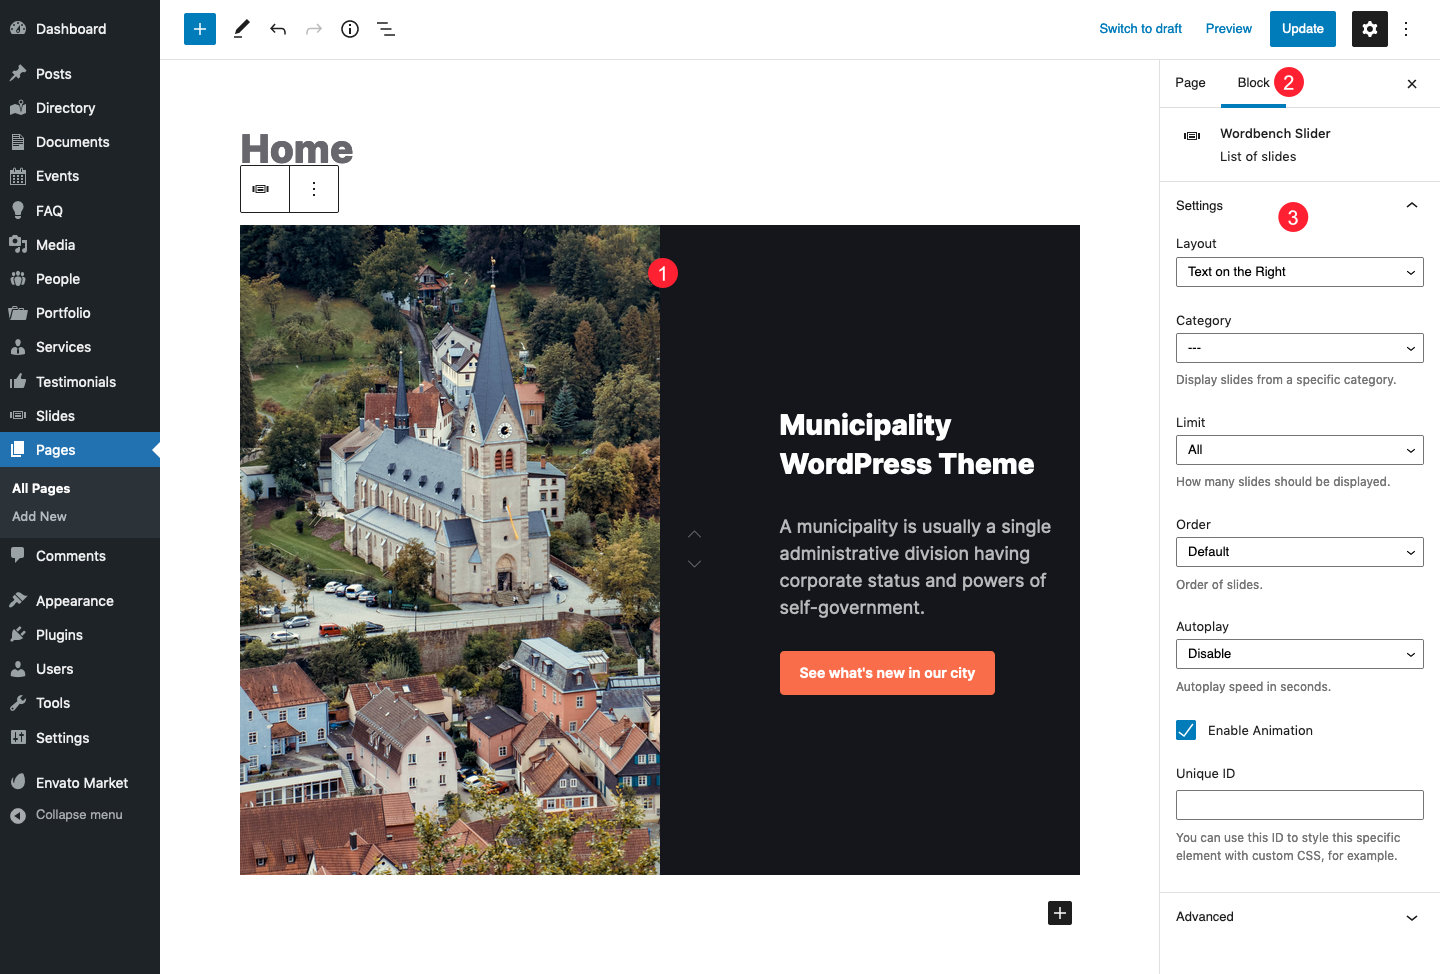
- Click on the element
- Make sure you are on the Block tab
- Change element's settings as you like
- Next stop is the Wordbench Sitemap element. Again, select it from the list of elements and click on it to edit its settings.
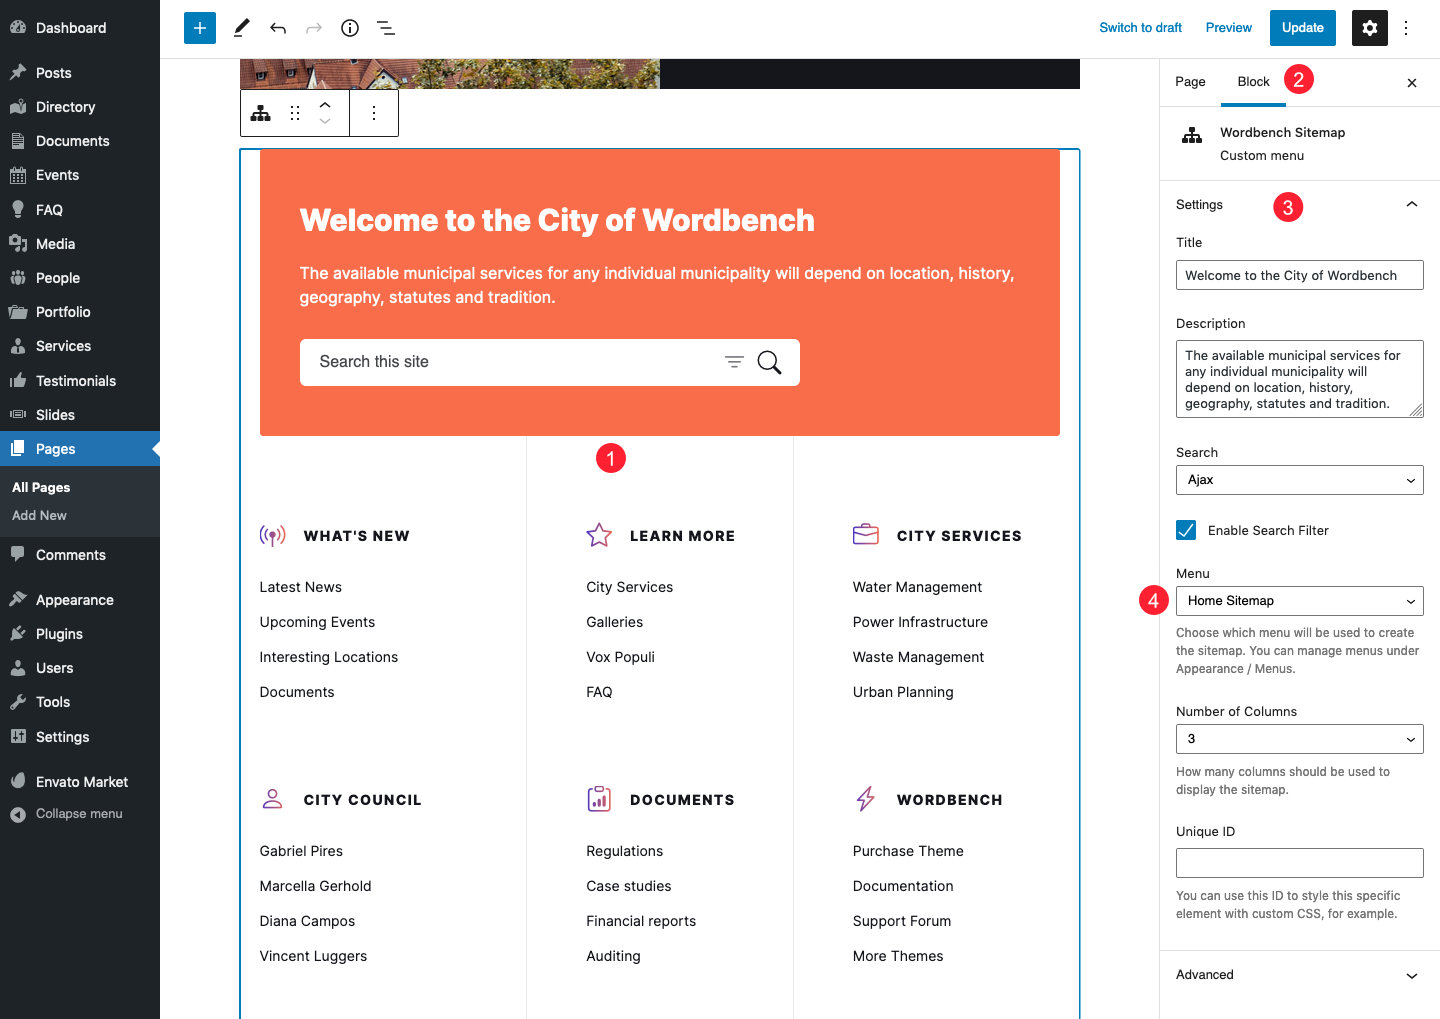
- Click on the element
- Make sure you are on the Block tab
- Change element's settings as you like
- Choose the menu we created at the beginning of this tutorial from the Menu selectbox
- The third element is the Wordbench Posts. As always, select it from the list of elements and click on it to edit its settings.
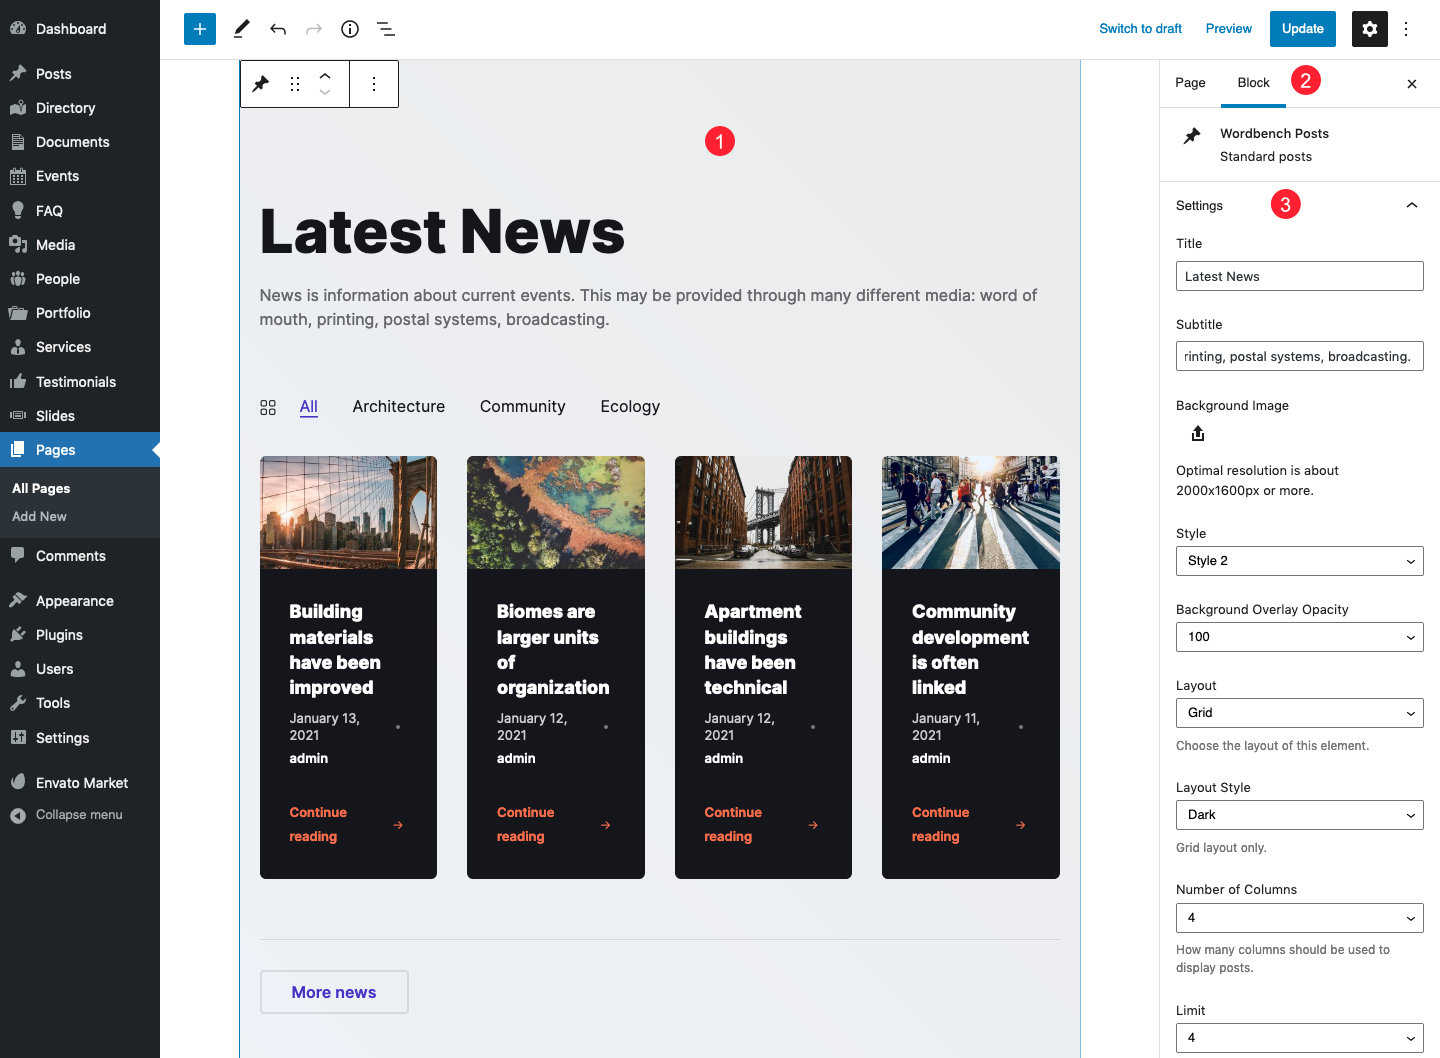
- Click on the element
- Make sure you are on the Block tab
- Change element's settings as you like
- The next element on this page is the Wordbench Split Screen. Once you insert it, click on it to edit its settings.
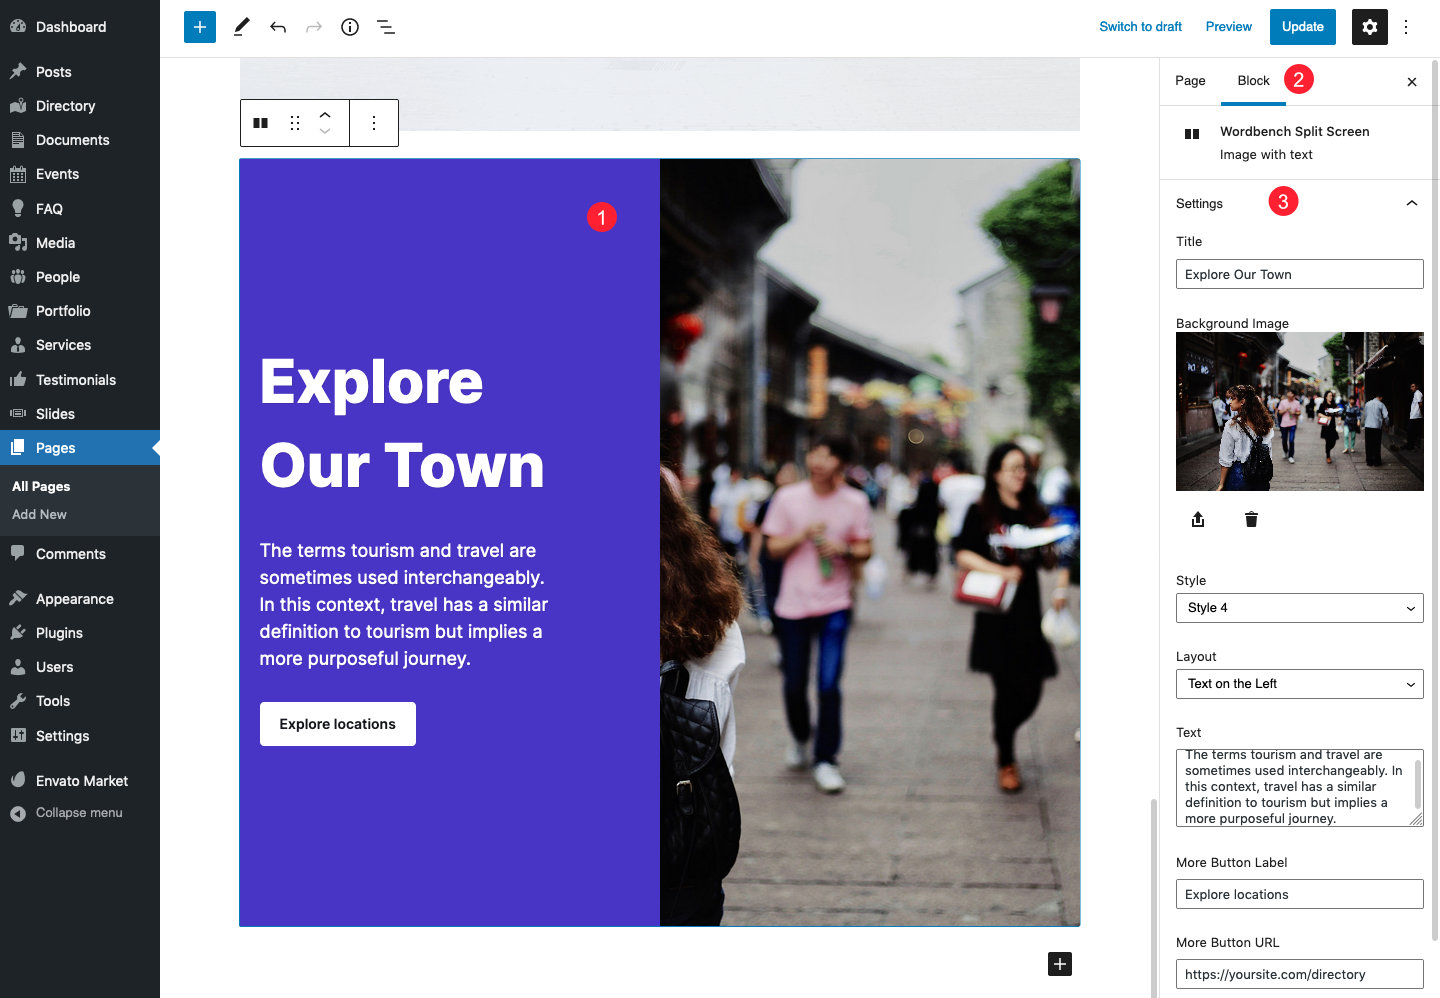
- Click on the element
- Make sure you are on the Block tab
- Change element's settings as you like
- The last element is the Wordbench Events. Again, select it from the list of elements and click on it to edit its settings.
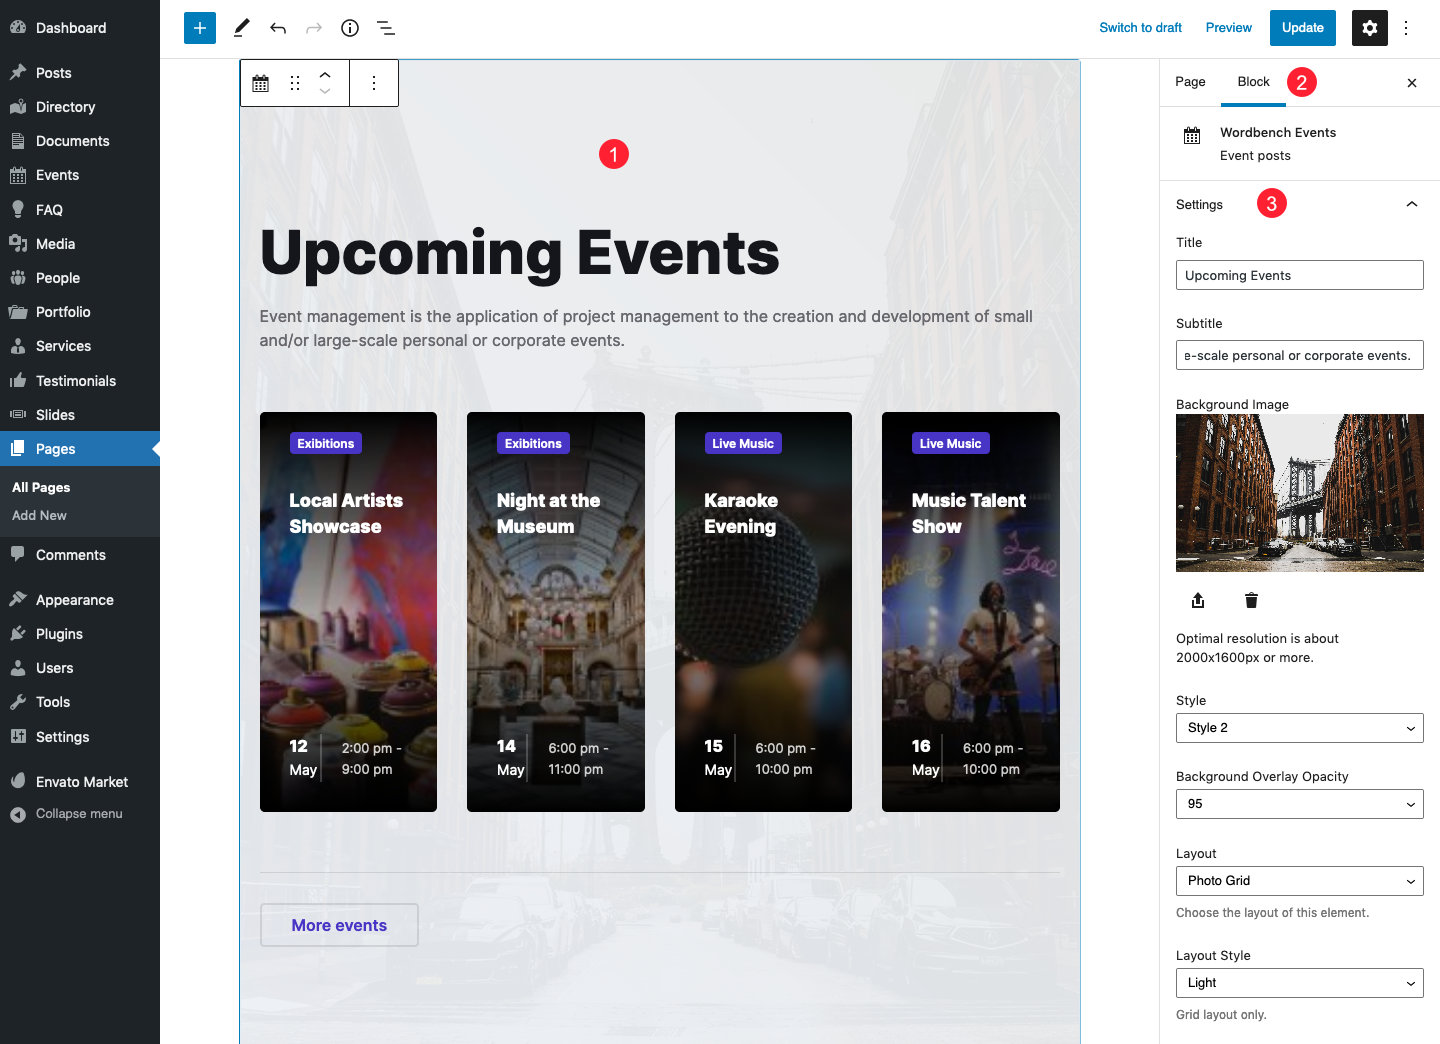
- Click on the element
- Make sure you are on the Block tab
- Change element's settings as you like
- Once you are done, save your page and set it as your front page under Settings / Reading.
Front Page 2
The following tutorial assumes that you want to create a front page similar to the "Home 2" from the demo. The preferred way to create a front page is using the native WordPress block editor (Gutenberg). Alternatively, you can use the WPBakery Page Builder or Elementor plugin. All elements and their respective options mentioned in this tutorial are available there as well (however it is highly recommended to use the Gutenberg, unless you have some very specific reason not to).
- Make sure you've already created or imported some standard, notice, event, document and Testimonial posts before creating this home page.
- This demo page contains one instance of Wordbench Sidebar element, which require a sidebar populated with some widgets to work. First, let's create the sidebar itself. Head to Appearance / Customize / Custom Sidebars and create a new sidebar.
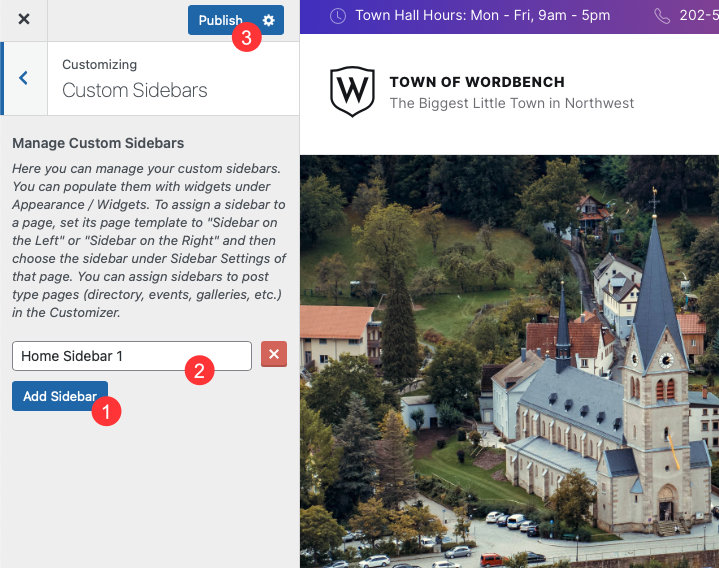
- Click on Add Sidebar to create a new sidebar
- Insert a recognizable name
- Save your changes
- Now let's go to Appearance / Widgets and populate these two new sidebars with widgets.
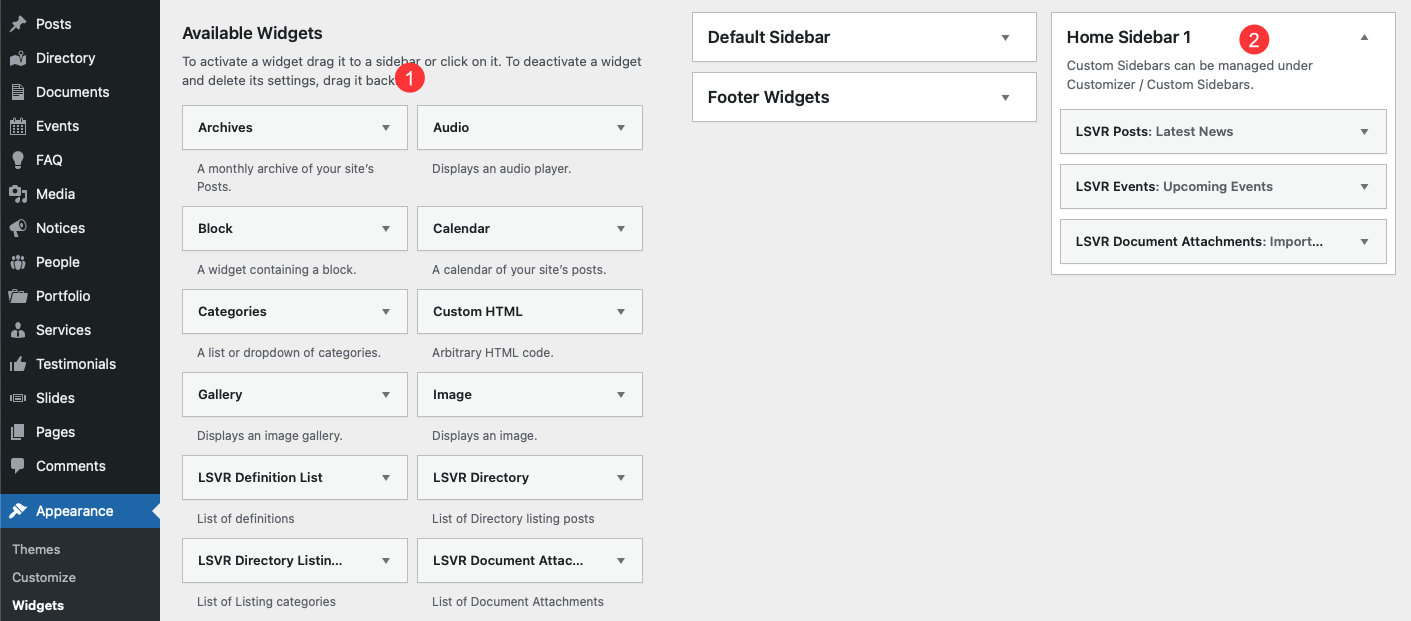
- Drag and drop widgets from the list of available widgets into a sidebar
- Insert widgets into Home Sidebar 1 and change their settings as you like. We are using LSVR Posts, LSVR Events and LSVR Document Attachments widgets in our demo.
- Now we are ready to create our home page. Let's create a new page under Pages, or edit an existing one. Set the page name and set the page template to Fullwidth w/o Title.
- Insert title which will be used just for your reference
- Set page template to "Fullwidth w/o Title"
- Next step is to start adding elements. Our first element is Wordbench Hero.
- Display list with all elements by clicking on the "plus" button in the top left of the interface
- You can type "wordbench" into the search field to list all Wordbench elements
- Click on Wordbench Hero to insert it (you can search directly for "wordbench hero" if you don't see it)
- Once the element is inserted, click on it and you can change its settings in the right sidebar.
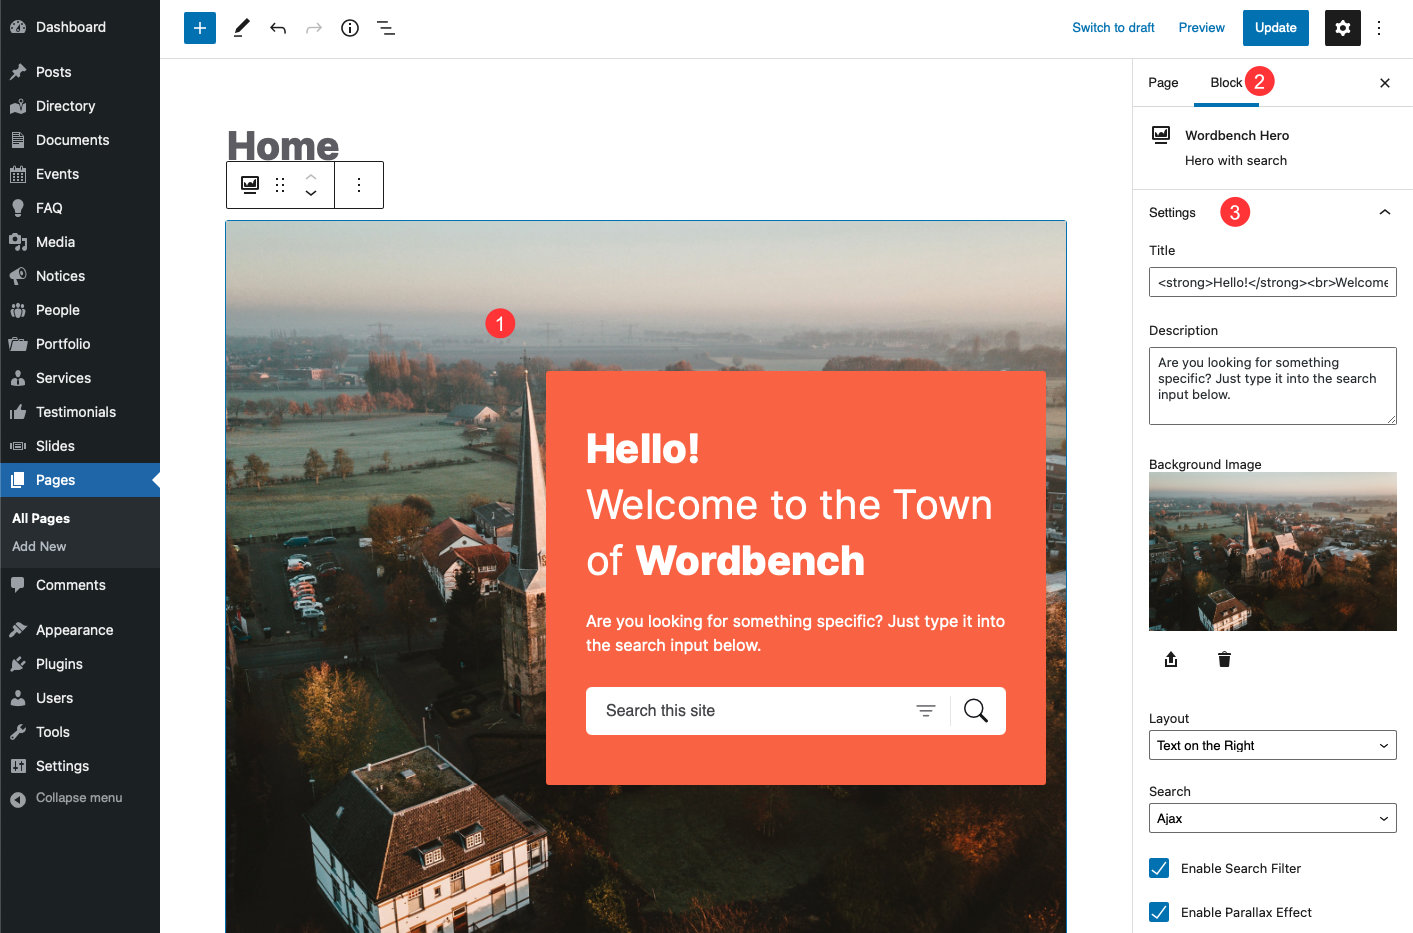
- Click on the element
- Make sure you are on the Block tab
- Change element's settings as you like
- The second element we will be adding is the Wordbench Notices element. Again, select it from the list of elements and click on it to edit its settings.
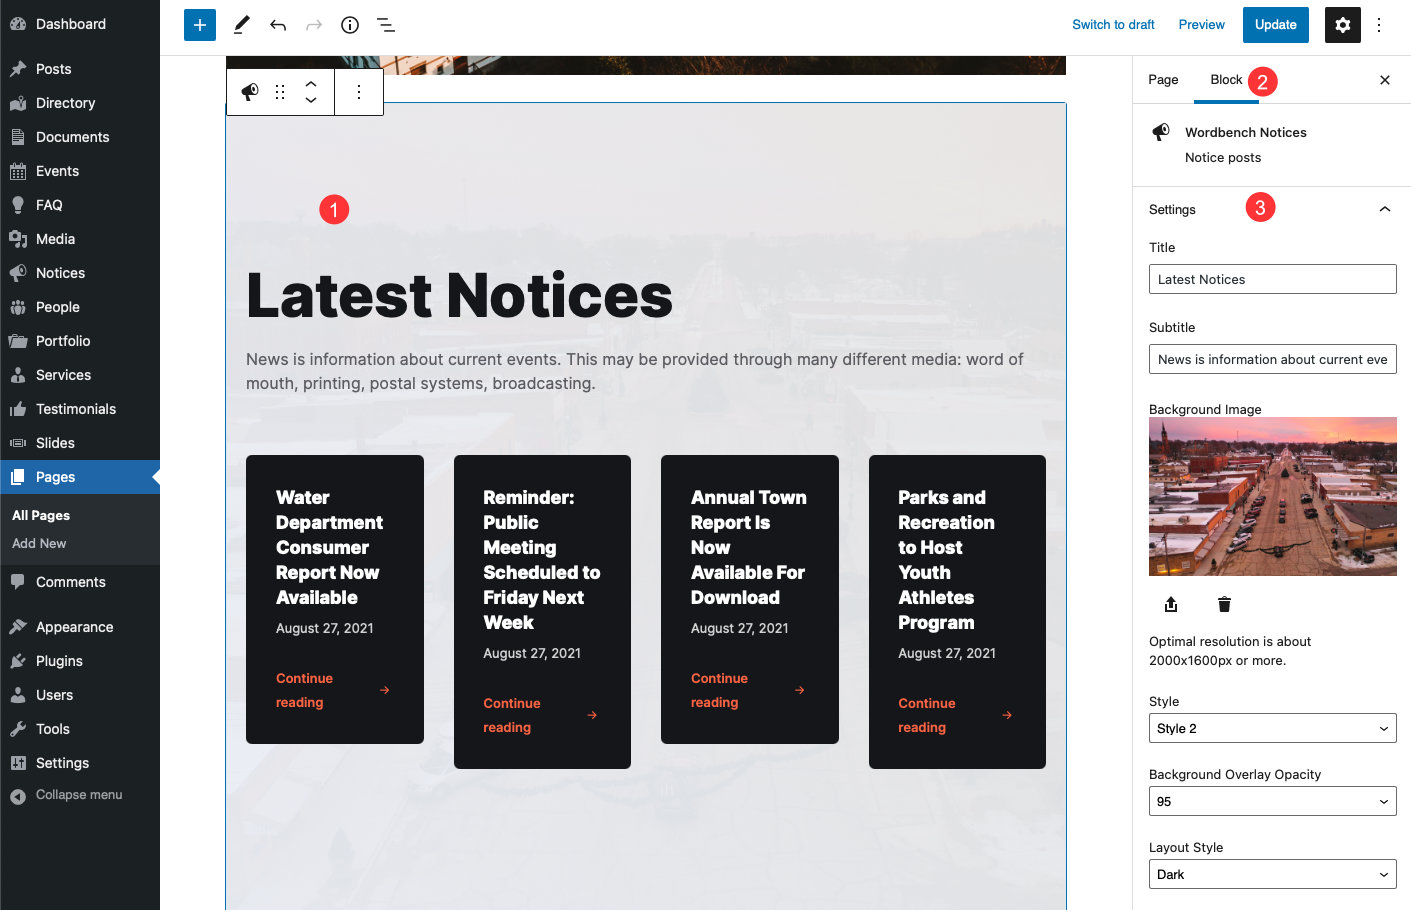
- Click on the element
- Make sure you are on the Block tab
- Change element's settings as you like
- Next stop is the Wordbench Sidebar element. Again, select it from the list of elements and click on it to edit its settings.
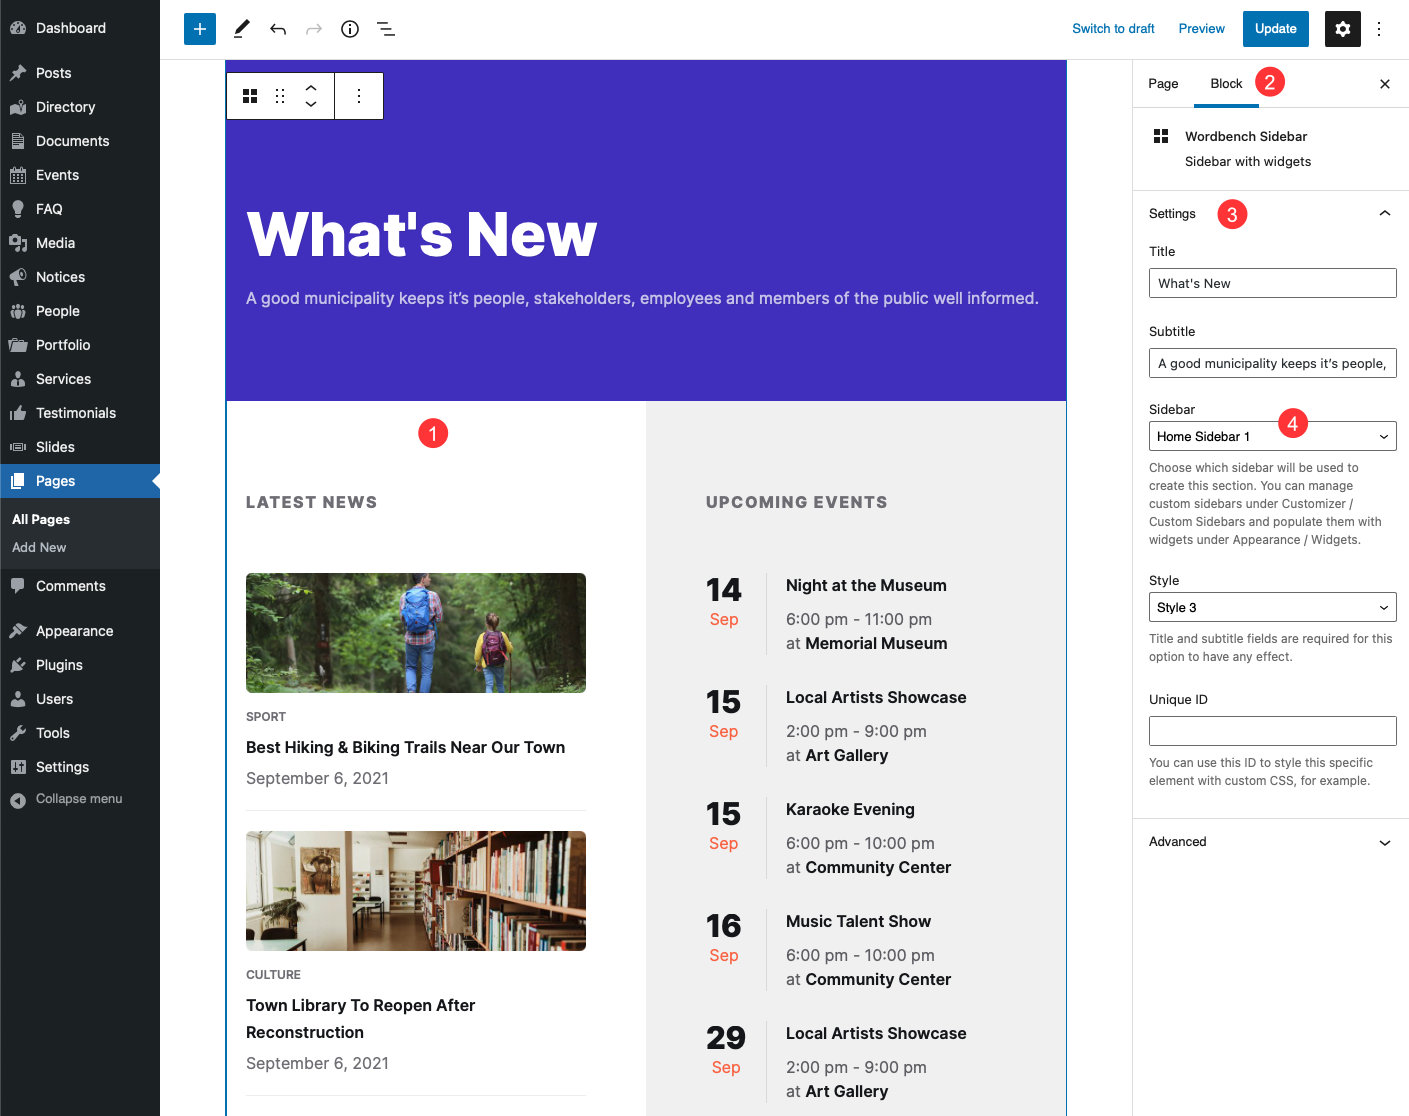
- Click on the element
- Make sure you are on the Block tab
- Change element's settings as you like
- Choose one of the sidebars we created at the beginning of this tutorial from the Sidebar selectbox
- The last element is the Wordbench Testimonials. As always, select it from the list of elements and click on it to edit its settings.

- Click on the element
- Make sure you are on the Block tab
- Change element's settings as you like
- Once you are done, save your page and set it as your front page under Settings / Reading.
Menus
Menus can be managed under Appearance / Menus. This theme contains four static menu locations - Primary Header Menu, Secondary Header Menu, Header Languages Menu and Footer Menu. More info about managing your menus can be found in the WordPress Codex.
Since this may be a bit overwhelming at first, let's take a better look on how to recreate a menu sytem from the demo.
Primary Header Menu
This is the main menu of the theme.
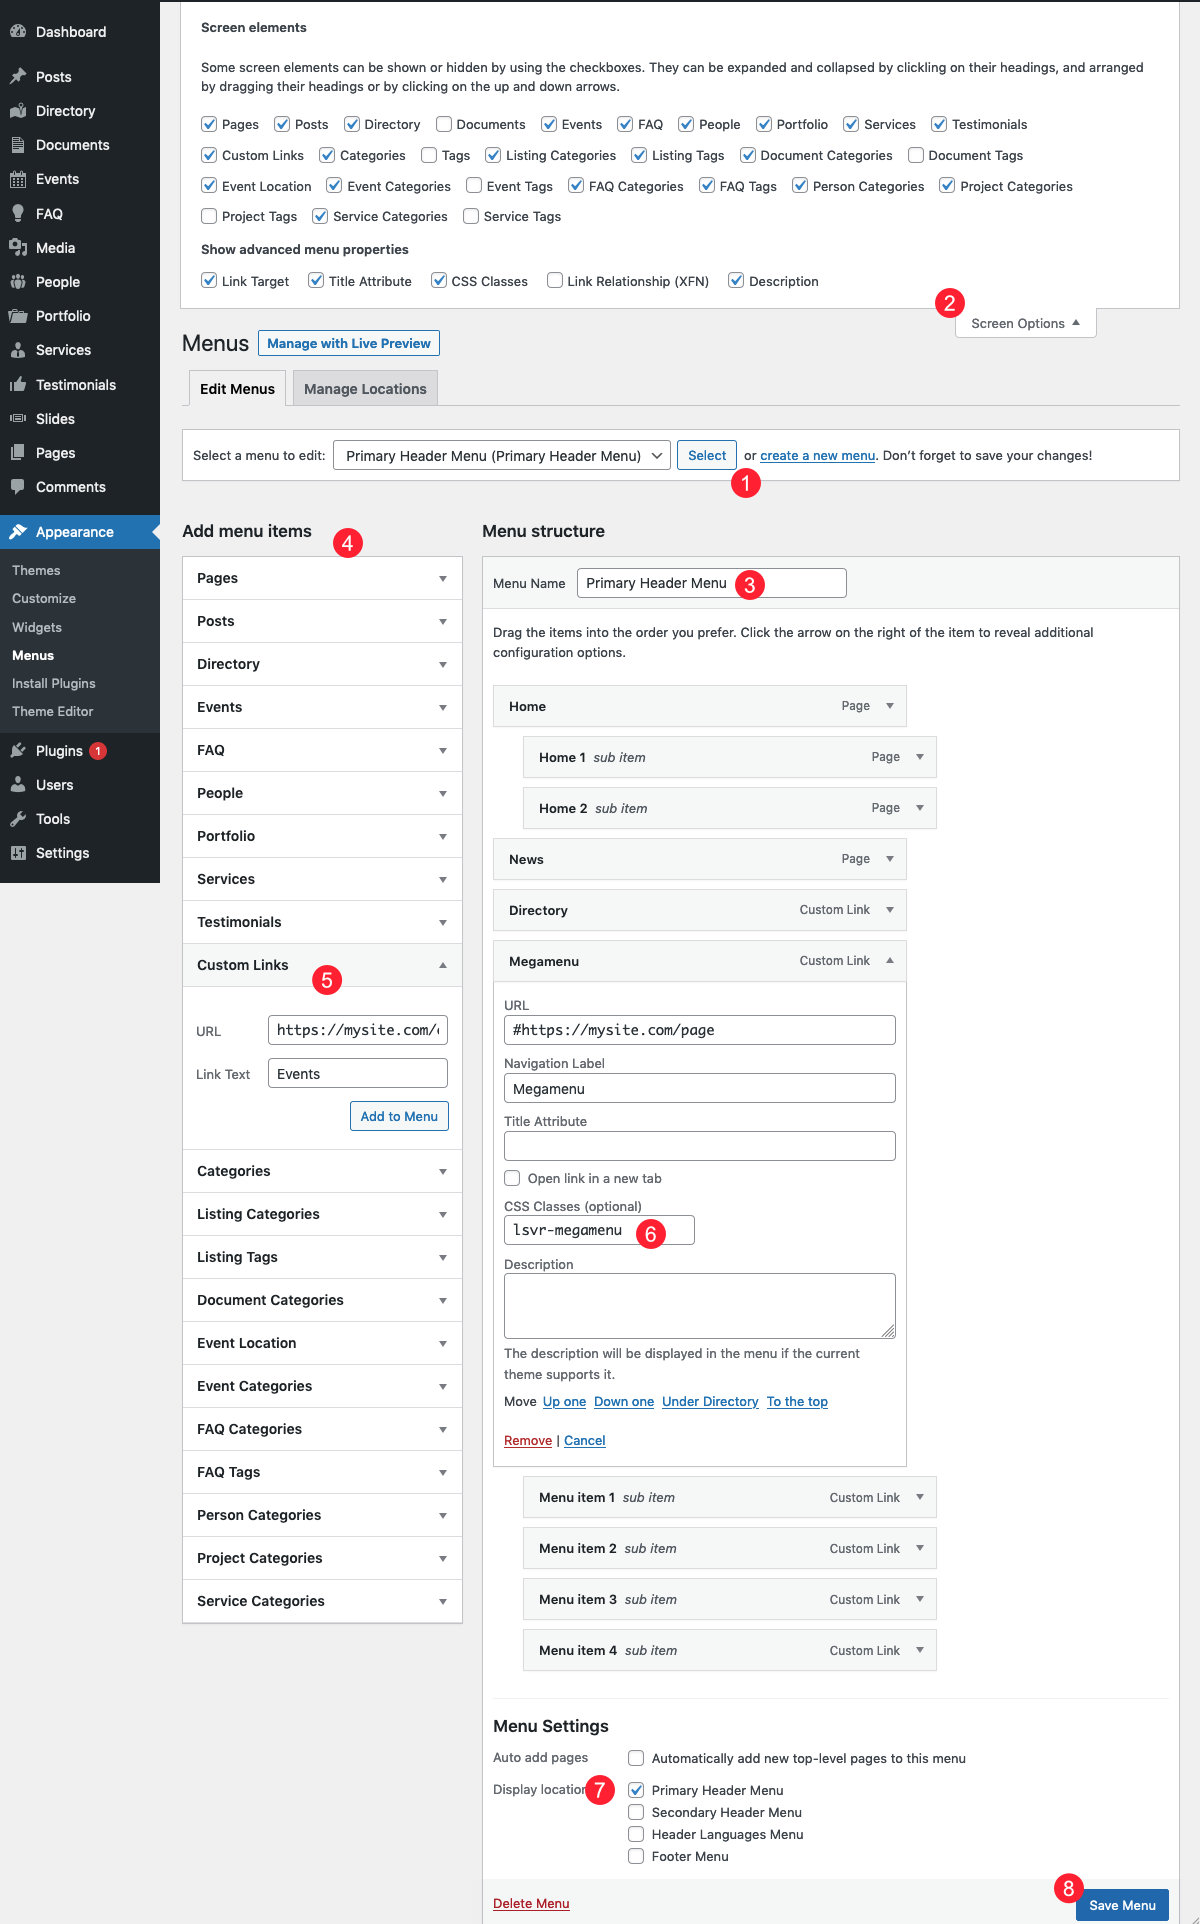
- Select an exiting menu or a create new one
- Choose which post types and taxonomies will be available in the left sidebar and enable advanced menu properties
- Insert a recognizable name
- Add items to your menu
- Use Custom Links option to add links to things like archive pages (yoursite.com/directory, yoursite.com/events, etc.)
- Add "lsvr-megamenu" class to the "CSS Classes" field to turn this item into megamenu. Add an additional "lsvr-megamenu--3-cols" class to use the three columns layout instead of the default fourt columns one, so the final class will look like this: "lsvr-megamenu lsvr-megamenu--3-cols" (without quotes).
- Set menu location to "Primary Header Menu"
- Save your menu
Secondary Header Menu
Secondary Header Menu is created in a similar way as the primary one. With the exception that it can contain only one navigation level. This means that there is no support for dropdowns or megamenu items. Don't forget to set the menu location to "Secondary Header Menu". Items in this menu can have an icon.
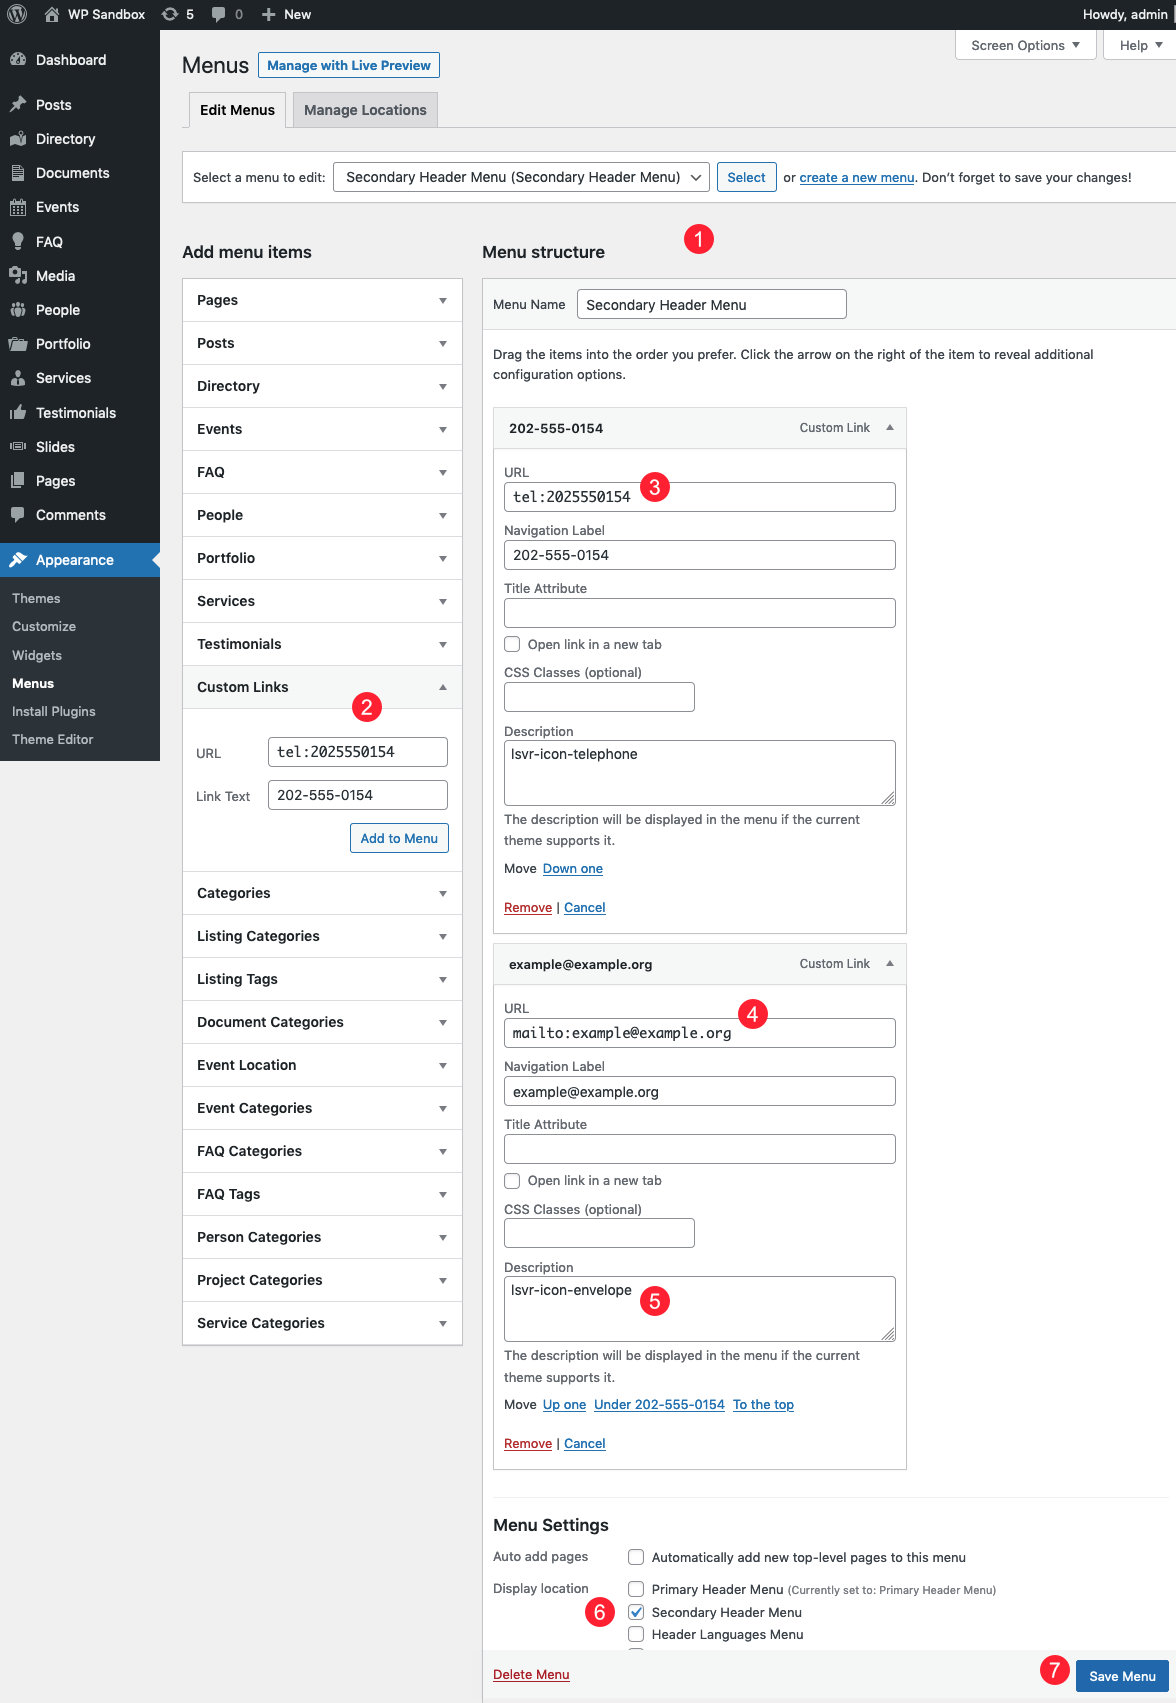
- Select an exiting menu or create a new one and gave it a meaningful name
- Use Custom Links option to add contact information
- Use "tel:123456789" URL format to add telephone number
- Use "mailto:example@example.org" URL format to add email address
- Add icon class name to "Description" field (make sure the field is enabled under Screen Options in the upper right corner of the screen)
- Set menu location to "Secondary Header Menu"
- Save your menu
Header Languages Menu
This menu is supposed to be used to link to alternative language versions of your site. Easiest way to achieve this is to use WP Multisite feature. This will allow you to run multiple websites on the same WordPress installation.
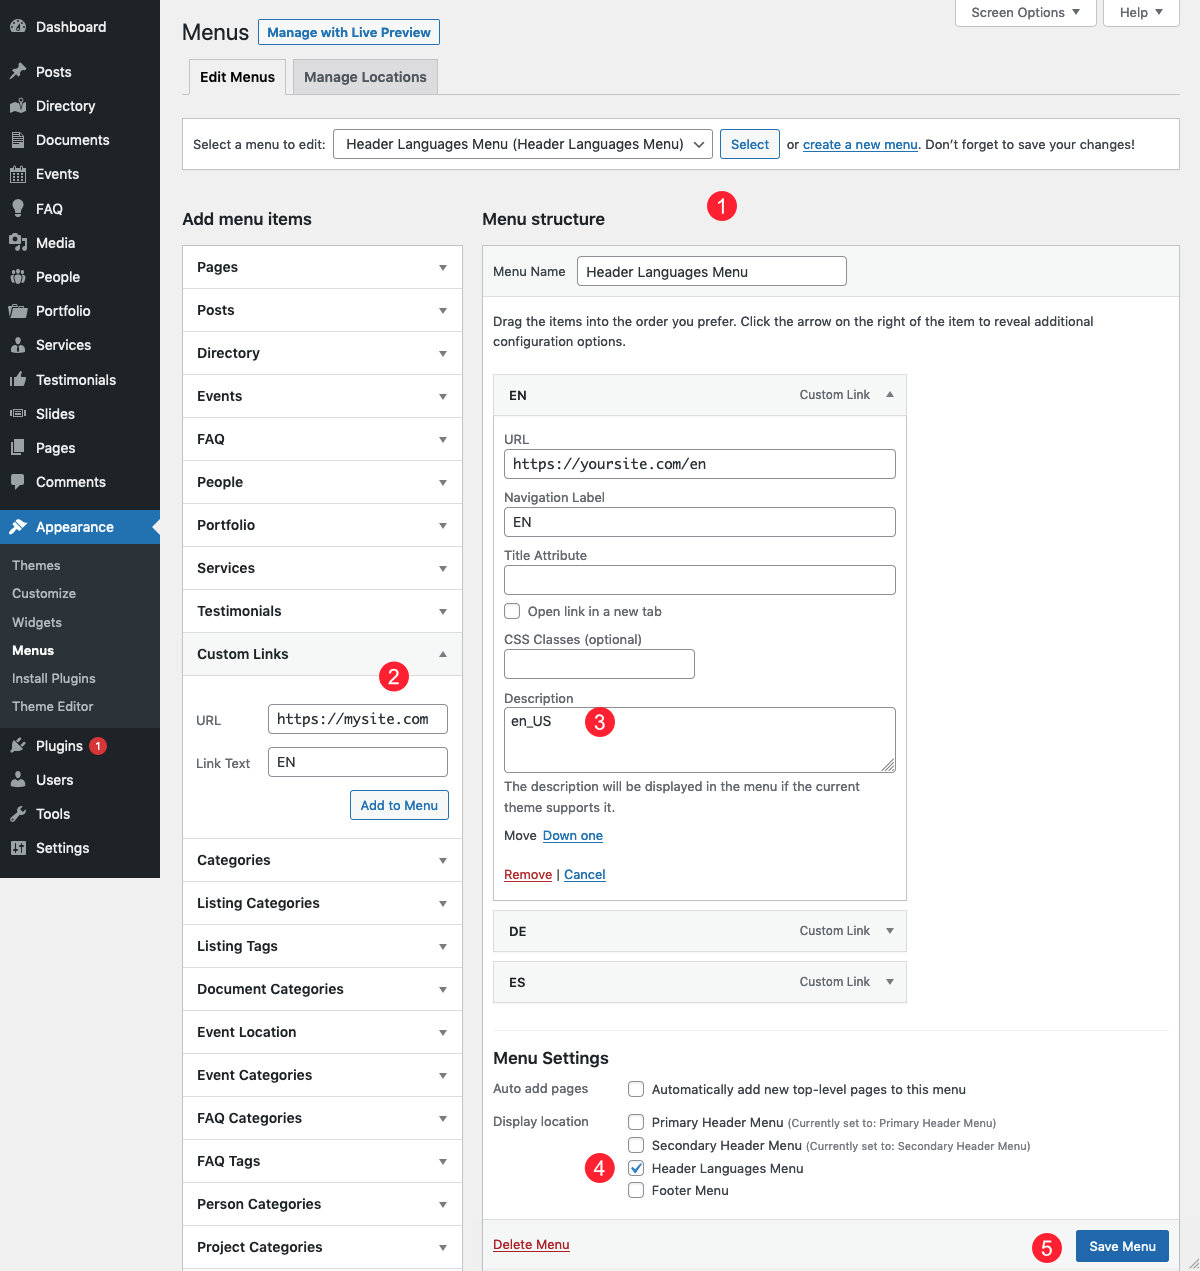
- Select an exiting menu or create a new one and gave it a meaningful name
- Use Custom Links option to add menu items
- Add the language code to the "Description" field. This code need to follow "xx_YY" format, where "xx" stands for your language code and YY for country code (for example "de_DE" for German).
- Set menu location to "Header Languages Menu"
- Save your menu
Footer Menu
This is a basic one-dimensional menu which appears at the bottom of the page.
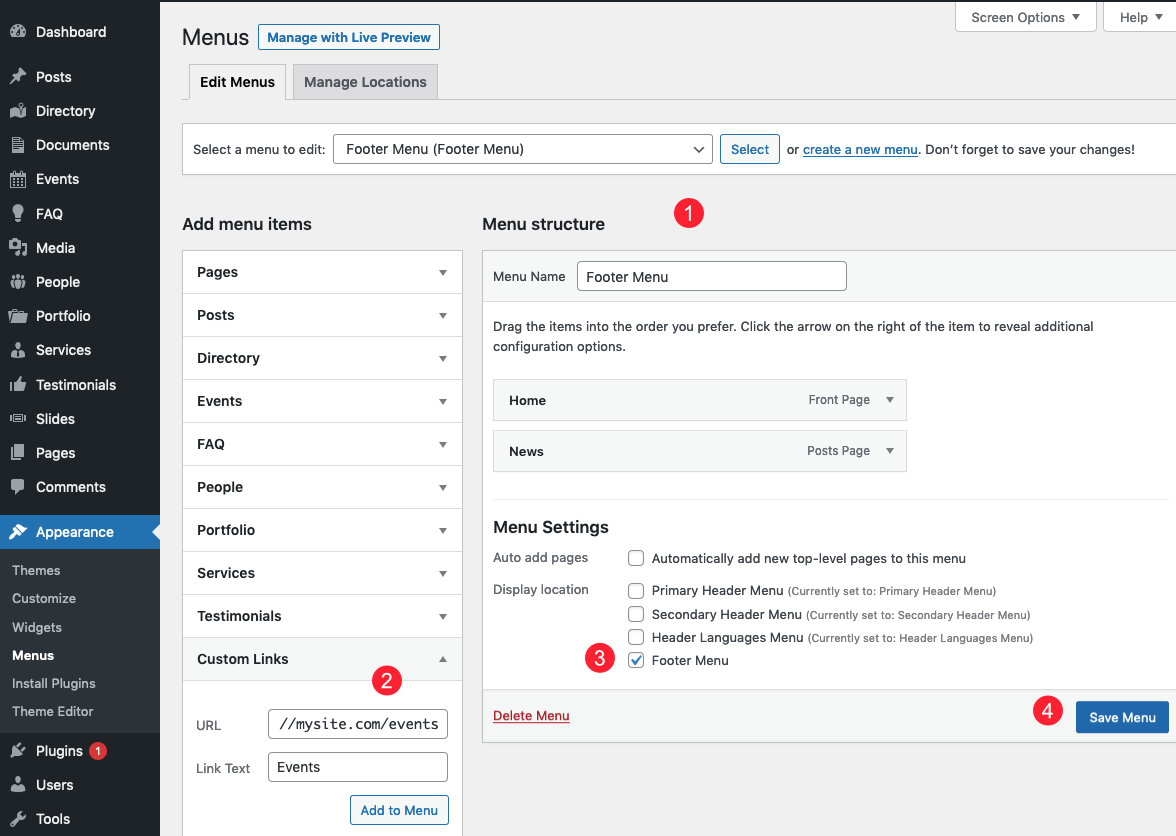
- Select an exiting menu or create a new one and gave it a meaningful name
- Use Custom Links option to add links to things like archive pages (yoursite.com/directory, yoursite.com/events, etc.)
- Set menu location to "Footer Menu"
- Save your menu
Other Menus
You can add a basic menu to any sidebar or Footer Widgets area using the Navigation Menu widget. Create the menu under Appearance / Menus as normal, then choose that menu in the widget options.
You can assign a menu to the Wordbench Sitemap element in the similar manner.
Sidebars & Widgets
Sidebars can be managed under Appearance / Widgets. By default there are two sidebar areas - left and right sidebar and Footer Widgets are which, as the name implies, contain widgets displayed in the footer of the site.
Left and Right Sidebar Areas
You can assign left or right sidebar to any standard page using Choose Sidebar To Display option in Sidebar Settings metabox. Make sure to use an appropriate page template.
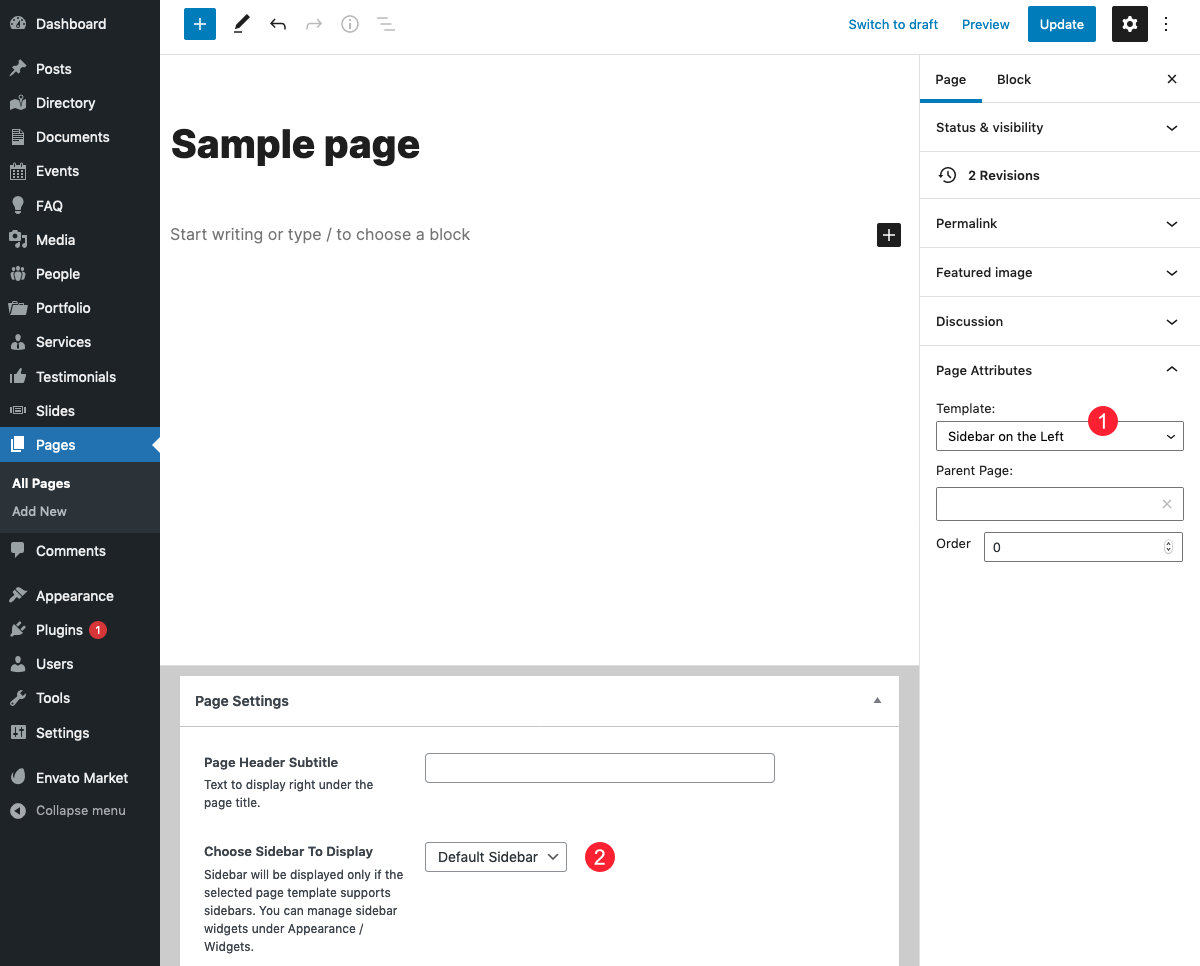
- Choose "Sidebar on the Left" or "Sidebar on the Right" page template
- Choose the sidebar
You can create additinal sidebars which can be assigned to left or right sidebar areas under Appearance / Customize / Custom Sidebars.
But what if you want to assign a sidebar to a post archive or post detail? Since those are not standard pages, there is a different approach to this. Sidebars for posts are managed under Appearance / Customize. Every post type has its own customizer section - Standard Posts, Directory, Events, Documents, FAQ, People, etc. Each of those sections contains Sidebar Position on Archive and Sidebar Position on Detail options to manage the post type's sidebars. Please note that this only apply to standard (blog) posts and LSVR post types.
Footer Widgets
Widgets placed into the Footer Widgets area under Appearance / Widgets will be automatically displayed in the site footer. You can change the number of columns under Appearance / Customize / Footer with the Number of Widget Columns option.
Colors
Theme colors can be managed under Appearance / Customize / Colors. You can either choose from predefined color schemes, pick your custom colors or create your own color scheme. The difference between Custom Colors and Custom Scheme is that the latter is much more involved and requires some coding. On the other hand, it gives you more freedom and it is the recommended way for customizing theme's colors.
Since the Predefined Scheme and Custom Colors options should be pretty much self-explanatory, let's describe the process of creating your own custom color scheme.
- Open http://yoursite.com/wp-content/themes/wordbench/assets/scss/color-schemes/default.scss file. It should open directly in your browser, but some browsers may download it on your disk instead.
If you are not able to access the file on your own installation, simply unpack the wordbench.zip installation file (please see the Theme Installation chapter to learn how to obtain it) and you will find the default.scss file under assets / scss / color-schemes folder. - Copy all the code from that file to any text editor. If your browser downloaded your file, open that file in the text editor. You can use for example Notepad++ for Windows or Brackets for Mac, but any basic text editor (for example Windows Notepad) should do.
- Make your changes. Basically you just need to change color variables at the top of the file. The most important ones are $accent1 and $accent2 variable on lines 28 and 29. By default, it looks something like this:
$accent1: #4935C5; // primary accent color
$accent2: #FA6D4B; // secondary accent color
There are many online tools where you can generate a hex code for your color, for example colorhexa.com. Just change #xxxxxx to the hex code of your custom color (don't forget that it has to start with the # sign). Feel free to change values of other color variables in the file as well.
- Once you've made your changes, copy the whole code and paste it to the SASS column on sassmeister.com (or any other online SASS to CSS convertor). Please note that any typo in your syntax may lead to an error.
- Copy the generated code from the CSS column.
- Make sure the child theme is active under Appearance / Themes.
- Go to Appearance / Editor, set Select theme to edit: to Wordbench Child and paste your generated CSS after the "/* Add your custom css after this comment */" comment.
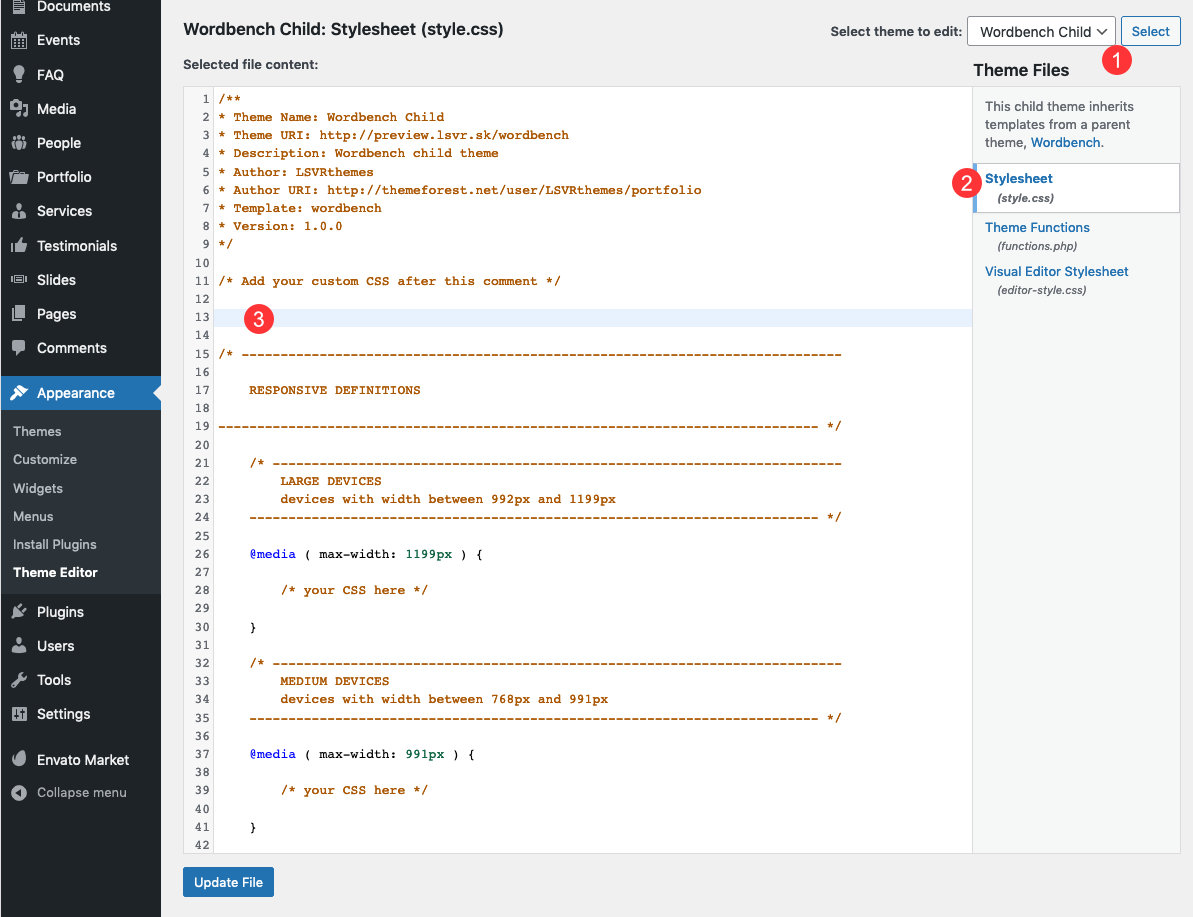
- Make sure Wordbench Child theme is selected
- Select the stylesheet file
- Put your CSS here and save your changes
- Next, repeat all the steps but now with the default editor color scheme file - http://yoursite.com/wp-content/themes/wordbench/assets/scss/color-schemes/default.editor.scss. Again, if you are not able to access it on your installation, unzip the wordbench.zip file and you will find it under assets / scss / color-schemes folder.
- There is one difference though, the final generated editor CSS code have to be pasted into editor-style.css file in your child theme instead (which is also accessible under Appearance / Editor).
- Last step: go to Appearance / Customizer / Colors, switch Set Colors By option to Custom Scheme and hit save.
Translation
If you are going to use this theme in any language other then English, you will need to translate it. The important part is that you need to translate the theme and all LSVR plugins you are using. Most of the translatable text is part of the admin area, so if you plan to translate only the front-end, there won't be that much text to translate.
There are two general approaches to translation. You can either use a 3rd party plugin, or do it the old-fashioned way via the Poedit software (recommended). If you prefer the plugin approach, check out their respective documentations on how to do that. We will describe the manual process of translation via Poedit, which we highly recommend instead of going the plugin route, as this approach is usually much more reliable.
Before we begin, download and install Poedit to your computer.
Theme Translation
- Make copy of the wordbench.pot file from the theme's languages folder. You can either just unzip the wordbench.zip file (which you've got from the full package) on your local computer and find the .pot file there, or you can use FTP to access your WP installation and copy the .pot file from the wp-content/themes/wordbench/languages folder.
- Paste the file anywhere on your computer and rename it to wordbench-xx_YY.po. "xx" stands for your language code and YY for country code (for example "wordbench-de_DE.po" for German). Notice how the file extension changed from ".pot" to ".po".
- Open your .po file in Poedit, make your changes and save the file. This will create a new file - wordbench-xx_YY.mo.
- Copy both wordbench-xx_YY.po and wordbench-xx_YY.mo to your WP installation under wp-content/languages/themes and that's it.
Plugins Translation
The whole process is very similar to theme translation, you just need to do it separately for each plugin. Let's translate the LSVR Events plugin for example (but it is the same for all LSVR plugins).
- Make copy of the lsvr-events.pot file from the LSVR Events plugin languages folder. You can either just unzip the lsvr-events.zip file from the Plugins folder (which you can find in the full package) on your local computer and find the .pot file there, or you can use FTP to access your WP installation and copy the .pot file from wp-content/plugins/lsvr-events/languages folder.
- Paste the file anywhere on your computer and rename it to lsvr-events-xx_YY.po. "xx" stands for your language code and YY for country code (for example "lsvr-events-de_DE.po" for German). Notice how the file extension changed from ".pot" to ".po".
- Open your .po file in Poedit, make your changes and save the file. This will create a new file - lsvr-events-xx_YY.mo.
- Copy both lsvr-events-xx_YY.po and lsvr-events-xx_YY.mo to your WP installation under wp-content/languages/plugins and that's it.
Icons
Check out the list of all built-in icons here. When a field in the admin allows you to add an icon, just add its name from the list, for example "lsvr-icon-bell" (without quotes).
More icons can be added via 3rd party plugins.
Code Customization
Code custimization is a broad topic which goes far beyond the scope of this documentation. The best place to start learning about the developer side of the WordPress is the WordPress Codex. Most of the knowledge needed to customize the theme is not theme-specific and can be applied to any theme. There are however some specifics which can come handy when you decide to customize this particular theme.
99% of the frontend code of this theme can be customized very easily by overriding the specific template files via a child theme. Apart from the basic WordPress theme files like header.php, footer.php, etc (you can read more about WordPress template hierarchy on the WordPress Codex), you will find many theme-specific templates inside template-parts folder. Just copy any of those files to your child theme (preserve the relative path) and edit them there.
However, the code for widgets, shortcodes and blocks is not always present in the theme folder. Code for all those elements resides in plugins. The good news is that frontend code of those elements is created using template files as well. You just need to find out which plugin contains the widget/shortcode you want to edit and copy its template file to your child theme under the correct folder using this formula:
For widgets:
[plugin-folder-name]/templates/widgets/[widget-template-file]
For shortcodes (and blocks):
[plugin-folder-name]/templates/shortcodes/[shortcode-template-file]
For example, if you want to override the code for the LSVR Featured Post widget, open wp-content/plugins/lsvr-elements/templates/widgets folder and copy post-featured.php file into your child theme folder under lsvr-elements/templates/widgets folder.
Many of the LSVR widget and shortcode templates are already being overridden by the theme itself. So if you want to customize those particular templates instead of original ones, you will find them in the theme's folder under the folder of a particular plugin. For example lsvr-elements/templates/widgets/post-featured.php file contains the template for the LSVR Featured Post widget. Please note that you should still copy the file to your child theme, do not edit the template in the parent theme!
How To
Display Old Events
To display events within a specific date range use URL like this:
yoursite.com/events/?date_from=2018-08-01&date_to=2018-12-31
To display all past events, use the URL like this:
yoursite.com/events/?period=past&order=desc
How To Update The Theme
The easiest way to update the theme is to use Envato Market plugin.
Alternatively, you can download the installable wordbench.zip file from your ThemeForest account / Downloads and then either unzip it and upload it under wp-content / themes via FTP (overwrite the existing wordbench folder), or upload the file via admin under Appearance / Themes / Add New / Upload Theme (you will have to deactivate and remove your current version of the theme first).
How To Update Bundled Plugins
Once you've updated the theme you should see an admin notification which will lead you through the process of updating the bundled plugins (if there are any which needs updating).
Alternatively, you can download the complete theme package from your ThemeForest account / Downloads, unzip it and check out the changelog.txt file to see which plugins were updated in the recent version. You will find all installable plugin files in the Plugins folder. Now, either unzip each plugin file you want to update and upload them under wp-content / plugins via FTP (overwrite the existing folders), or upload each .zip file via admin under Plugins / Add New / Upload Plugin (you will have to deactivate and remove your current versions of those plugins first).
How To Add Post Excerpt
Excerpt is a short text which can be displayed on post archive pages or in some widgets instead of the full post content. You can add excerpt for standard posts and some custom post types.
If you are using the WordPress block editor (Gutenberg), you can add excerpt in the right panel when editing a post (make sure you are switched to Document tab at the top of the panel). If you are not seeing the Excerpt field, click on "dots" icon in upper right corner to enable the field.
If you are NOT using the block editor (for example when you are using the Classic Editor plugin), then while editing a post, click on Screen Options in upper right corner, check Excerpt and scroll down to see the Excerpt field under the editor.
How To Setup Contact Form
To add a contact form similar to one seen in the demo site, first install and activate the Contact Form 7 plugin. Then download and unzip the full theme package from your ThemeForest account / Downloads (if you haven't already) and upload the cf7-contact-form.xml file from the Demo Data folder under Tools / Import / WordPress in your admin (you may be prompted to install the additional plugin during the process). Please follow the official documentation on how to properly configure the plugin.
How To Reorder Posts and Categories
The easiest way to do it is to use Intuitive Custom Post Order plugin. Once instaled and activated, head to Settings / Intuitive CPO and check which post types and taxonomies you want to enable this functionality for. After that, you will be able to reorder them via simple drag & drop in your admin.